
精通
英语
和
开源
,
擅长
开发
与
培训
,
胸怀四海
第一信赖
精通
英语
和
开源
,
擅长
开发
与
培训
,
胸怀四海
第一信赖
该应用程序是一个简单的职位搜索。它带有后台,也用了GPS技术,虽然没用JSON,但也有很大的参考价值。用Android手机,用户可以根据用户当前位置(使用GPS)和职位位置在职位网站(ASP.NET网站)中搜索职位。用户将输入搜索关键字和里程数,他将根据他当前的位置获得他输入的距离内的所有工作。
该应用程序将涉及以下知识:
以下是用于开发上述应用程序的工具和IDE:
首先,让我用包含职位广告记录的数据库表来解释托管的Web服务。以下是我们在“ Job”表中添加的记录。
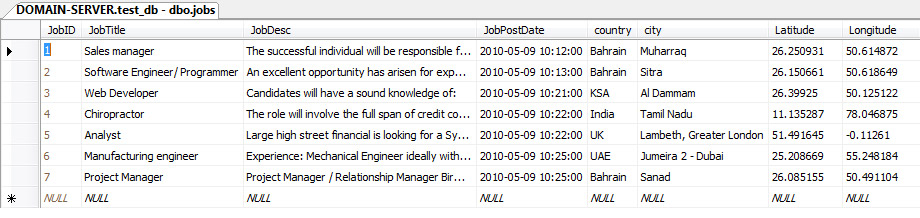
请注意,我们为每个职位添加了“ Latitude”和“ Longitude”值。这将与GPS中的当前位置进行比较,并计算距离(以英里为单位)。
我在SQL Server中有一个函数,它将计算两个Geo Points(Latitude,Longitude)之间的距离。请参阅以下代码:
RETURNS float
AS
BEGIN
declare @retVal float;
if (@Latitude1=0 and @Longitude1=0)
set @retVal =0
else
begin
-- CONSTANTS
DECLARE @EarthRadiusInMiles float;
DECLARE @PI float;
SET @EarthRadiusInMiles = 3963.1
SET @PI = PI();
-- RADIANS conversion
DECLARE @lat1Radians float;
DECLARE @long1Radians float;
DECLARE @lat2Radians float;
DECLARE @long2Radians float;
SET @lat1Radians = @Latitude1 * @PI / 180;
SET @long1Radians = @Longitude1 * @PI / 180;
SET @lat2Radians = @Latitude2 * @PI / 180;
SET @long2Radians = @Longitude2 * @PI / 180;
set @retVal = Acos
(
Cos(@lat1Radians) * Cos(@long1Radians) * Cos(@lat2Radians) * Cos(@long2Radians) +
Cos(@lat1Radians) * Sin(@long1Radians) * Cos(@lat2Radians) * Sin(@long2Radians) +
Sin(@lat1Radians) * Sin(@lat2Radians)
) * @EarthRadiusInMiles;
end
return @retVal
END
接下来,我有一个托管在本地主机的.NET Web服务,服务带有Web方法“ JobSearch”。Web方法将接收来自用户的Search关键字、里数、当前纬度值和当前经度值,并将查询数据库以获取结果。上述函数用于查询计算距离。
try
{
int miles_int = Convert.ToInt32(miles);
if (miles_int == 0)
{
latitude = "0";
longitude = "0";
}
string sql = "select *,dbo.CoordinateDistanceMiles
(" + latitude + "," + longitude + ",latitude,longitude)
'DistanceMiles' from jobs where ";
if (miles_int > 0)
sql +=" dbo.CoordinateDistanceMiles(" + latitude + "," +
longitude + ",latitude,longitude) <" + miles+ " and ";
sql +=" (jobtitle like '%" + keyword + "%' or jobdesc like '%" +
keyword + "%') order by jobpostdate desc ";
SqlCommand cmd = new SqlCommand(sql, conn);
conn.Open();
SqlDataReader dr = cmd.ExecuteReader(CommandBehavior.CloseConnection);
while (dr.Read())
{
job jb = new job(Convert.ToInt32(dr["jobid"]), dr["jobtitle"].ToString(),
Convert.ToString(dr["jobdesc"]), Convert.ToDateTime(dr["jobpostdate"]),
Convert.ToString(dr["city"]), Convert.ToString(dr["country"]),
((double)(dr["DistanceMiles"])), ((double)(dr["latitude"])),
((double)(dr["longitude"])));
retVal.Add(jb);
}
}
finally
{
conn.Close();
conn.Dispose();
}
return retVal.ToArray();
}
下面的C#类“ job.cs ”使用了上面的方法:
///<summary>
/// Summary description for job
///</summary>
public class job
{
private int _JobID = 0;
private string _JobTitle = null;
private string _JobDesc = null;
private DateTime _JobPostDate = new DateTime();
private string _country = null;
private string _city = null;
private double _Latitude = 0;
private double _Longitude = 0;
private string _distancemiles = "0";
public int JobID
{
set { _JobID = value; }
get { return _JobID; }
}
public string JobTitle
{
set { _JobTitle = value; }
get { return _JobTitle; }
}
public string JobDesc
{
set { _JobDesc = value; }
get { return _JobDesc; }
}
public DateTime JobPostDate
{
set { _JobPostDate = value; }
get { return _JobPostDate; }
}
public string Country
{
set { _country = value; }
get { return _country; }
}
public string City
{
set { _city = value; }
get { return _city; }
}
public double Latitude
{
set { _Latitude = value; }
get { return _Latitude; }
}
public double Longitude
{
set { _Longitude = value; }
get { return _Longitude; }
}
public string DistanceMiles
{
set { _distancemiles = value; }
get { return _distancemiles; }
}
public job(){}
public job(int jobid, string jobtitle, string jobdesc,
DateTime jobpostdate, string cit, string cnt, double miles,
double lat, double longt)
{
_JobID = jobid;
_JobTitle = jobtitle;
_JobDesc = jobdesc;
_JobPostDate = jobpostdate;
_distancemiles = miles.ToString("0.00");
_Latitude = lat;
_Longitude = longt;
_city = cit;
_country = cnt;
}
}
假设已经安装并配置了Eclipse和Android SKD,有关更多信息,请点击此处。
我已经用启动界面启动了我的应用程序。它只是包含应用程序名称标志的第一个界面,将显示大约5秒钟,并将导航到主应用程序界面。
android:id="@+id/widget0"
android:layout_width="fill_parent"
android:layout_height="fill_parent"
xmlns:android="http://schemas.android.com/apk/res/android"
>
<ImageView
android:id="@+id/widget30"
android:layout_width="wrap_content"
android:layout_height="wrap_content"
android:layout_x="150px"
android:layout_y="80px"
android:src="@drawable/jobs_logo"
>
</ImageView>
<TextView
android:id="@+id/widget32"
android:layout_width="wrap_content"
android:layout_height="wrap_content"
android:layout_x="110px"
android:layout_y="20px" android:text="JOBS IN MY AREA - Android Job Search">
</TextView>
</AbsoluteLayout>
下面是包含调用启动界面的线程函数的Java类。
public class job_engine extends Activity {
/** Called when the activity is first created. */
protected boolean _active = true;
protected int _splashTime = 2000;
@Override
public void onCreate(Bundle savedInstanceState) {
//initially call the main screen which is the splash screen
super.onCreate(savedInstanceState);
setContentView(R.layout.main);
// thread for displaying the next screen
Thread splashTread = new Thread() {
@Override
public void run() {
try {
int waited = 0;
while(_active && (waited < _splashTime)) {
sleep(100);
if(_active) {
waited += 100;
}
}
} catch(InterruptedException e) {
// do nothing
} finally {
//the finish function will close the current activity
//which is the "main" screen.
finish();
//after waiting.. display the "home" screen: application main screen.
Intent i = new Intent(job_engine.this, homescreen.class);
startActivity(i);
stop();//stop thread.
}
}
};
splashTread.start();
}
@Override
public boolean onTouchEvent(MotionEvent event) {
if (event.getAction() == MotionEvent.ACTION_DOWN) {
_active = false;
}
return true;
}
}
接下来,是“Home”界面,它只包含三个按钮和三个用于构建菜单的鼠标。
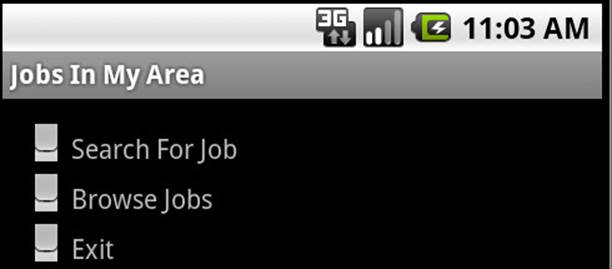
注意:在这里,我不是专注于在Android中布局组件,我假设开发人员已经知道如何构建布局。有关Android布局的详细信息,请参阅了解Android中的用户界面。
简单易看的代码,下面的代码就显示了如何将点击事件附加到按钮上。
public void onCreate(Bundle icicle)
{
//set the contentview to the homescreen
super.onCreate(icicle);
setContentView(R.layout.homescreen);
//get the buttons objects.
btn1 = (Button) findViewById(R.id.btn1);
btn2 = (Button) findViewById(R.id.btn2);
btn3 = (Button) findViewById(R.id.btn3);
Label4 = (TextView) findViewById(R.id.Lable4);
//create onclick event handler
btn1.setOnClickListener(new OnClickListener()
{
@Override
public void onClick(View v) {
// TODO Auto-generated method stub
//this will open new screen
Intent i = new Intent(homescreen.this, jobsearch.class);
startActivity(i);
}
});
//=======================================================
btn2.setOnClickListener(new OnClickListener()
{
@Override
public void onClick(View v) {
// TODO Auto-generated method stub
//the browse functionality is not implemented yet
NotImplemented();
}
});
//=======================================================
btn3.setOnClickListener(new OnClickListener()
{
@Override
public void onClick(View v) {
// TODO Auto-generated method stub
//this will close the application
finish();
}
});
或者,您可以利用Android菜单建立菜单系统。在这种情况下,您需要按手机中的“菜单”按钮才能显示菜单,并显示在手机界面的底部。

以下是实现Android菜单的代码:
/* Handles item selections */
public boolean onOptionsItemSelected(MenuItem item) {
switch (item.getItemId()) {
case 1:
Intent i = new Intent(homescreen.this, jobsearch.class);
startActivity(i);
return true;
case 2:
NotImplemented();
return true;
case 3:
finish();
return true;
}
return false;
}
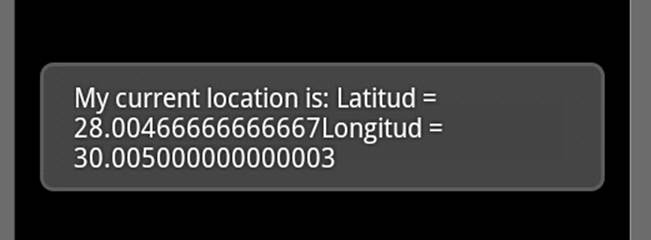
在“Home”界面中,我有GPS功能来检测用户的当前位置。对于这个功能,我创建了一个实现“ LocationListener” 的新类,所以每当GPS感觉到一个新的位置时,这个回调函数将从Android系统调用。
我们将添加我们自己的个人位置监听器,并覆盖强制性功能。在我们的例子中,我们只会在以下情况下向界面打印一条消息:
见下面的代码:
public class MyLocationListener implements LocationListener
{
@Override
public void onLocationChanged(Location loc)
{
//just passing the current latitude and logtude values to an external class
//for later use.
CurrentLocation.Latitude =Double.toString(loc.getLatitude());
CurrentLocation.Longitude = Double.toString(loc.getLongitude());
String Text = "My current location is: " +
"Latitud = " + loc.getLatitude() +
"Longitud = " + loc.getLongitude();
Toast.makeText(getApplicationContext(), Text, Toast.LENGTH_SHORT).show();
}
@Override
public void onProviderDisabled(String provider)
{
Toast.makeText(getApplicationContext(), "Gps Disabled", Toast.LENGTH_SHORT ).show();
}
@Override
public void onProviderEnabled(String provider)
{
Toast.makeText( getApplicationContext(), "Gps Enabled", Toast.LENGTH_SHORT).show();
}
@Override
public void onStatusChanged(String provider, int status, Bundle extras)
{
}
}
/* End of Class MyLocationListener */
现在,为了显示当前的位置信息,我们需要在“ OnCreate”方法中添加以下代码:
LocationManager mlocManager = (LocationManager)getSystemService
(Context.LOCATION_SERVICE);
LocationListener mlocListener = new MyLocationListener();
mlocManager.requestLocationUpdates( LocationManager.GPS_PROVIDER,
0, 0, mlocListener);
注意:为了能够访问GPS,我们必须在AndroidManifest.xml文件中添加权限:
在“ manifest”标签之后添加权限行。见下文:
package="job.engine"
android:versionCode="1"
android:versionName="1.0">
<uses-permission android:name="android.permission.ACCESS_FINE_LOCATION"/>
要模拟位置更新,我们需要通过telnet连接到模拟器,并执行以下操作:
geo fix 30 28
你应该得到这些结果:
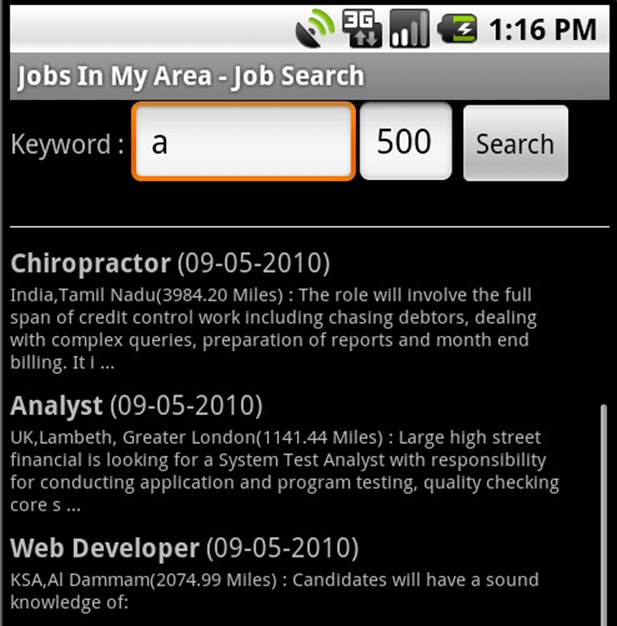
接下来,是“职位搜索”界面,其中包含两个文本框和搜索按钮。此界面中的用户将输入搜索关键字和“里程距离”,然后单击搜索以查询Web服务中的职位记录。
我使用KSoap2 Library与.NET Web Service通信。
为了能够与Web服务通信,您必须在清单文件中添加以下权限行:
OnClick搜索按钮的“ ”方法执行时间太长。所以,我需要一些解决方案,这将在后台完成任务。处理程序对于这个问题是非常好的解决方案。
如果您不会使用这种方法,那么用户将看到该程序看起来挂起。
如何使用它。首先你需要覆盖该handleMessage 方法。
其次,您需要创建Thread。
这是OnClick搜索按钮的“ ”事件。
@Override
public void onClick(View v) {
// TODO Auto-generated method stub
//on clicking the search button.. will call the "StartThread"
//function that contains the thread running the handler
StartThread();
}
});
这是上面提到的“ StartThread”函数的代码:
这是包含整个搜索过程的“DoSearch ”函数。
//this function is taking long time.. that is why we use handler and thread
protected void DoSearch()
{
try
{
// get the text entered in the search box
String keyword = key_txt.getText().toString();
//show alert if the user did not enter anything to search
if (keyword.equals(""))
{
Dialog dlg = new AlertDialog.Builder(this)
.setIcon(R.drawable.icon)
.setTitle("Jobs In My Area")
.setPositiveButton("OK", null)
.setMessage("Please, Enter Keyword to search")
.create();
dlg.show();
}
else
{
lbl_ws.setText("");
TableLayout tbl1 = (TableLayout) findViewById(R.id.tbl1);
tbl1.removeAllViews();
//start calling the web service.
//create soap request
SoapObject request = new SoapObject(NAMESPACE, METHOD_NAME1);
//send the parameters
request.addProperty("methodName","JobSearch");
request.addProperty("keyword", keyword);
request.addProperty("miles",miles_txt.getText().toString());
request.addProperty("latitude", lat);
request.addProperty("longitude", lng);
//create soap client
SoapSerializationEnvelope envelope =new SoapSerializationEnvelope
(SoapEnvelope.VER11);
envelope.dotNet = true;
envelope.setOutputSoapObject(request);
HttpTransportSE androidHttpTransport = new HttpTransportSE(URL);
//call the web method from the URL
androidHttpTransport.call(HelloWorld_SOAP_ACTION, envelope);
//get the response as raw;
SoapObject objs = (SoapObject)envelope.getResponse();
//check the there is a results or not
if (objs.getPropertyCount()==0)
{
Dialog dlg = new AlertDialog.Builder(this)
.setIcon(R.drawable.icon)
.setTitle("Jobs In My Area")
.setPositiveButton("OK", null)
.setMessage("No Jobs Found for the search keyword specified!")
.create();
dlg.show();
return;
}
//loop through the results set
for(int i=0;i< objs.getPropertyCount();i++)
{
//JobList +=objs.getPropertyCount();
SoapObject obj = (SoapObject) objs.getProperty(i);
//making the job title bold. using the "SpannableString"
SpannableString jobTitle = new SpannableString
(obj.getProperty("JobTitle").toString());
jobTitle.setSpan(new StyleSpan(Typeface.BOLD),0,0,0);
// Date d = (Date) obj.getProperty("JobPostDate");
String date_raw = obj.getProperty("JobPostDate").toString();
String Formatted_Date = date_raw.substring(8,10) +
"-" + date_raw.substring(5,7) + "-" + date_raw.substring(0,4);
SpannableString jobPostDate = new SpannableString(Formatted_Date);
jobPostDate.setSpan(new StyleSpan(Typeface.ITALIC), 0, 0, 0);
String JobDesc = obj.getProperty("Country").toString();
JobDesc += "," + obj.getProperty("City").toString();
JobDesc += "(" + obj.getProperty
("DistanceMiles").toString() + " Miles)";
JobDesc += " : " + obj.getProperty("JobDesc").toString();
if (!JobDesc.equals(""))
{
if (JobDesc.length()>200)
JobDesc = JobDesc.substring(0, 200) + " ...";
}
TextView lbl = new TextView(this);
TextView lbl2 = new TextView(this);
TextView lbl3 = new TextView(this);
lbl.setText(jobTitle);
lbl2.setText(" (" + jobPostDate + ")");
lbl3.setText(JobDesc);
lbl3.setTextSize(10);
//start build up the table
//creating table row
TableRow tr = new TableRow(this);
LinearLayout Cell1 = new LinearLayout(this);
Cell1.addView(lbl);
Cell1.addView(lbl2);
//adding the cell to the row.
tr.addView(Cell1);
TableRow tr2 = new TableRow(this);
LinearLayout Cell2 = new LinearLayout(this);
Cell2.addView(lbl3, new LinearLayout.LayoutParams
(450, LayoutParams.WRAP_CONTENT));
tr2.addView(Cell2);
TableRow tr3 = new TableRow(this);
LinearLayout Cell3 = new LinearLayout(this);
View hr = new View(this);
//hr.setBackgroundColor(Color.WHITE);
hr.setMinimumHeight(9);
Cell3.addView(hr); //adding spacer only
tr3.addView(Cell3);
//registering click for the row.
tr.setClickable(true);
tr.setId(Integer.parseInt(obj.getProperty("JobID").toString()));
// Register handler for UI elements
tr.setOnClickListener(new View.OnClickListener() {
public void onClick(View v) {
// Log.d(TAG, "mAddAccountButton clicked");
int rowid;
rowid = v.getId();
String args = Integer.toString(rowid);
//function to be called when the row is clicked.
GetRowID(args);
}
});
//adding the row to the table.
tbl1.addView(tr); //adding job title row
tbl1.addView(tr2); // job desc text
tbl1.addView(tr3); // spacer row
}
}
}
catch(Exception e)
{
lbl_ws.setText(e.toString()) ;
}
finally
{
pd.dismiss();
SearchTread.stop();
}
}
注意:如果您需要访问所用机器的本地主机,例如当您希望仿真器客户端联系在同一主机上运行的服务器时,请使用别名10.0.2.2来引用主机的回送接口。从仿真器的角度来看,localhost(127.0.0.1)是指自己的环回接口。这就是为什么我有Web服务URL为:
在上述相同的功能中,我们创建一个表格布局来保存我们的记录:
//inside the loop
TableRow tr = new TableRow(this);
LinearLayout Cell1 = new LinearLayout(this);
Cell1.addView(lbl);
Cell1.addView(lbl2);
//adding the cell to the row.
tr.addView(Cell1);
TableRow tr2 = new TableRow(this);
LinearLayout Cell2 = new LinearLayout(this);
Cell2.addView(lbl3, new LinearLayout.LayoutParams
(450, LayoutParams.WRAP_CONTENT));
tr2.addView(Cell2);
TableRow tr3 = new TableRow(this);
LinearLayout Cell3 = new LinearLayout(this);
View hr = new View(this);
//hr.setBackgroundColor(Color.WHITE);
hr.setMinimumHeight(9);
Cell3.addView(hr); //adding spacer only
tr3.addView(Cell3);
//outside the loop
//adding the row to the table.
tbl1.addView(tr); //adding job title row
tbl1.addView(tr2); // job desc text
tbl1.addView(tr3); // spacer row
为了使表行可点击,以便用户可以查看职位详细信息,我们注册了一个点击事件。
“ GetRowID”功能将打开职位ID参数对应的“职位详细信息”界面。以下是将参数传递给“ Intent”:
//passing the parameters - Job ID
i.putExtra("JobID",Args);
startActivity(i);
}
接下来,在“职位详细信息”界面中,我们将需要读取从上一界面传递的参数。为此,我们需要在“ OnCreate” 中添加以下代码:
//get the parameter by name
String JobID = bun.getString("JobID");
//this will again connect to the web service and get the job details by id.
PopulateJob(JobID);
在MAP中显示职位位置
当用户单击职位以查看职位详细信息时,他可以选择在MAP中查看职位位置。我已经使用Android的Google MAP库。注意:您需要具有Google API密钥。
在布局文件中,我有以下代码:
android:id="@+id/mapview1"
android:layout_width="fill_parent"
android:layout_height="fill_parent"
android:clickable="true"
android:apiKey="your key is here"
/>
这里是完整的Java文件,用于显示地图:
import com.google.android.maps.GeoPoint;
import com.google.android.maps.MapActivity;
import com.google.android.maps.MapController;
import com.google.android.maps.MapView;
public class map extends MapActivity
{
private MapView myMap;
private double lat;
private double lon;
@Override
public void onCreate(Bundle icicle)
{
super.onCreate(icicle);
setContentView(R.layout.map);
myMap = (MapView) findViewById(R.id.mapview1); //Get map from XML
lat = Double.parseDouble(CurrentLocation.Latitude);
lon = Double.parseDouble(CurrentLocation.Longitude);
navigateToLocation((lat * 1000000),
(lon * 1000000), myMap); //display the found address
}
@Override
protected boolean isRouteDisplayed() {
// TODO Auto-generated method stub
return false;
}
public static void navigateToLocation
(double latitude, double longitude, MapView mv) {
GeoPoint p = new GeoPoint((int) latitude, (int) longitude); //new GeoPoint
mv.displayZoomControls(true); //display Zoom
MapController mc = mv.getController();
mc.animateTo(p); //move map to the given point
int zoomlevel = mv.getMaxZoomLevel(); //detect maximum zoom level
mc.setZoom(zoomlevel - 1); //zoom
mv.setSatellite(false); //display only "normal" mapview
}
}
想研究安卓APP里多个接口互动,这个例子非常好,有后台接口,有GPS接口,还有谷歌地图接口,值得大家学习参考。如果想要源代码,对文章里细节不明白,请找锐英源孙老师,微信ryysoft,QQ396806883.