
精通
英语
和
开源
,
擅长
开发
与
培训
,
胸怀四海
第一信赖
精通
英语
和
开源
,
擅长
开发
与
培训
,
胸怀四海
第一信赖
锐英源精品开源心得,转载请注明:“锐英源www.wisestudy.cn,孙老师作品,电话13803810136。”需要全文内容也请联系孙老师。
The Face Access Control application is one of a series of IoT reference implementations aimed at instructing users on how to develop a working solution for a particular problem. The solution uses facial recognition as the basis of a control system for granting physical access. The application detects and registers the image of a person’s face into a database, recognizes known users entering a designated area and grants access if a person’s face matches an image in the database.
From this reference implementation, developers will learn to build and run an application that:
人脸识别控制程序是一系列IoT参考实现之一,旨在指导用户如何为特定问题开发工作解决方案。该解决方案使用面部识别作为用于授予物理访问的控制系统的基础。应用程序检测并将人脸图像登记到数据库中,识别进入指定区域的已知用户,并在人的脸部与数据库中的图像匹配时授予访问权限。
通过此参考实现,开发人员将学习构建和运行以下应用程序:
The Face Access Control system consists of two main subsystems:
人脸识别控制系统由两个主要子系统组成:
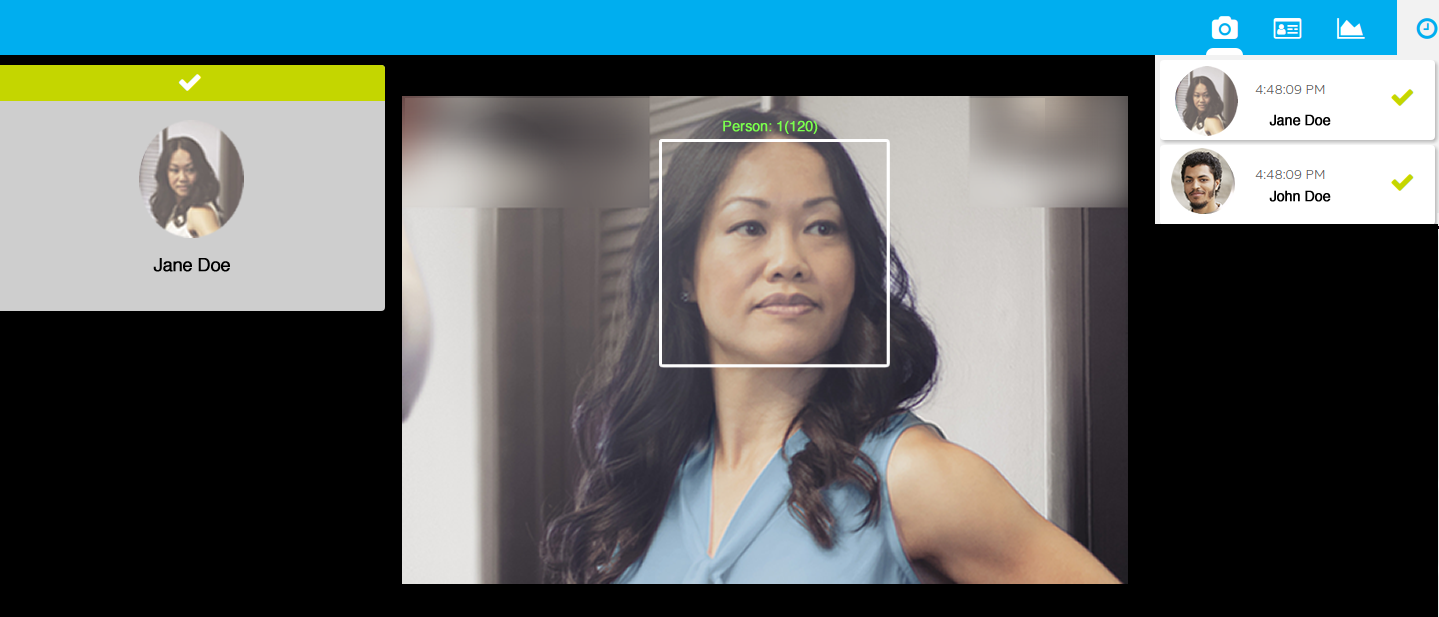
In the UI, there are three tabs:
This is what the live streaming video tab looks like:
在UI中,有三个选项卡:
这就是直播视频选项卡的样子:
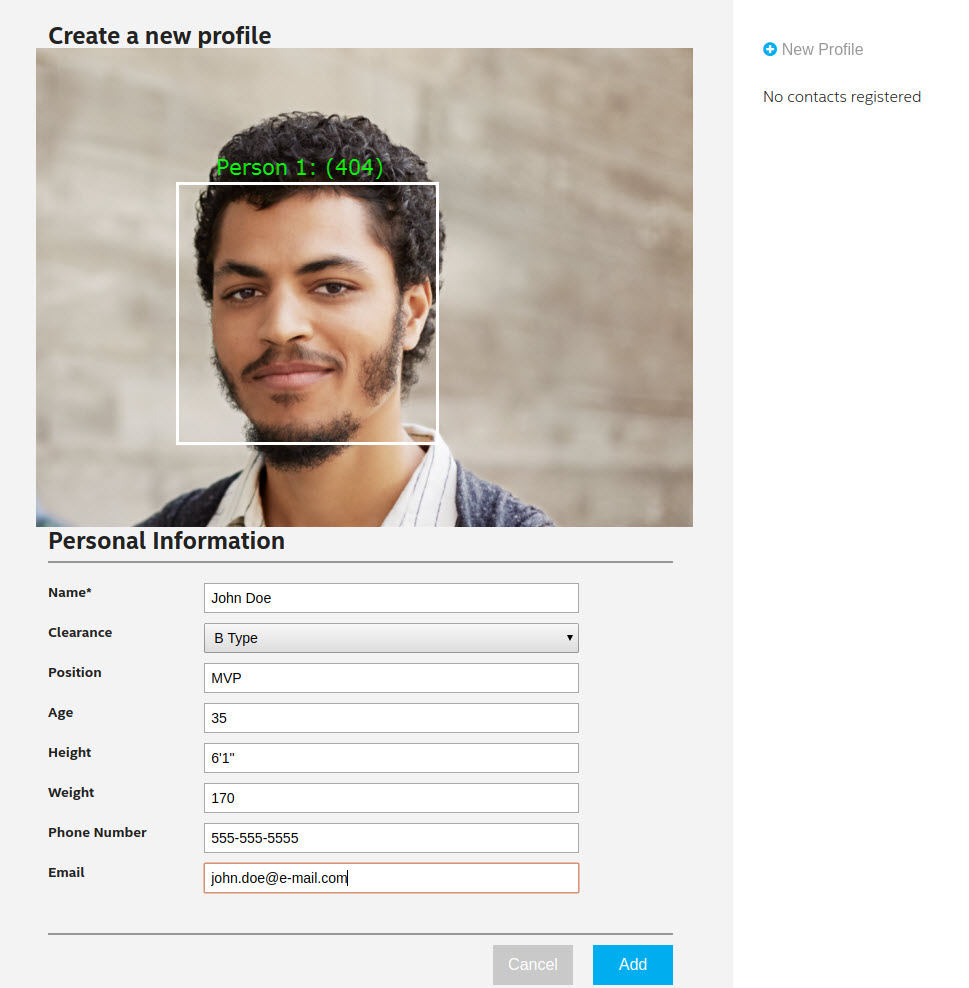
This is what the user registration tab looks like:这是用户注册选项卡的样子:
This is an example of the analytics tab:这是分析选项卡的示例:

The Intel® CV SDK requires OpenCL*, which is available as a separate download. We provide a script that helps with the installation process here. Unpack the archive using:
英特尔®CVSDK需要OpenCL*,可单独下载。我们提供了一个脚本,在安装过程有助于在这里。使用以下命令解压缩存档:
tar xf install_OCL_driver2_sh.tgz
Then prepare a temporary workspace and run the script:然后准备一个临时工作区并运行脚本:
mkdir opencl-temp ./install_OCL_driver2.sh install --workspace opencl-temp
For this application you do not need to recompile the Linux* kernel thus answer no when asked during the installation process. Additional details and instructions are provided in this article. The System Analyzer Utility mentioned in the article can be use to confirm proper installation.
对于此应用程序,您无需重新编译Linux *内核,因此在安装过程中询问时请回答否。本文提供了其他详细信息和说明。本文中提到的系统分析器实用程序可用于确认正确安装。
The guide for installing the Intel® CV SDK is offered here. After completing the registration, download the archive for Ubuntu*, unpack it, and run the GUI installer:
此处提供了安装英特尔®CVSDK的指南。完成注册后,下载Ubuntu *的存档,解压缩并运行GUI安装程序
tar xaf intel_cv_sdk_ubuntu_<version>.tgz
cd intel_cv_sdk_ubuntu_<version>
./install_GUI.sh
When prompted, install as the root user or as a user with root permissions. The rest of the guide assumes you will install the Intel® CV SDK under the default location.
After installation, don't forget to source the CV SDK environment variables:
出现提示时,以root用户或具有root权限的用户身份安装。本指南的其余部分假定您将在默认位置安装英特尔®CVSDK。
安装后,不要忘记获取CV SDK环境变量:
source /opt/intel/computer_vision_sdk_<version>/bin/setupvars.sh
This will be required for building and running cvservice. To automate this process, you can source the script from .profile or .bashrc. Alternatively, you can add the variables to /etc/environment.
这将是构建和运行cvservice所必需的。要自动执行此过程,您可以从.profile或.bashrc中获取脚本。或者,您可以将变量添加到/ etc / environment。
This reference implementation uses ffmpeg to compress and stream video output from cvservice to the webservice clients. ffmpeg is installed separately from the Ubuntu repositories:
此参考实现使用ffmpeg压缩和流式传输从cvservice到webservice客户端的视频。ffmpeg与Ubuntu存储库分开安装:
sudo apt update
sudo apt install ffmpeg
This reference implementation uses MQTT to send data between services. To install the dependencies:此参考实现使用MQTT在服务之间发送数据。要安装依赖项:
sudo apt update sudo apt install libssl-dev
Building the executable (from cvservice directory):构建可执行文件(来自cvservice目录):
mkdir build
cd build
cmake ..
make
Instructions on how to setup the Node.js services are provided in the webservice folder.webservice文件夹中提供了有关如何设置Node.js服务的说明。
Start the webservice, both server and front-end components.启动Web服务,包括服务器和前端组件
Start ffserver with:启动ffserver:
sudo ffserver -f ./ffmpeg/server.conf
Export the needed ENV vars:导出所需的ENV变量:
export MQTT_SERVER=localhost:1883
export MQTT_CLIENT_ID=cvservice
export FACE_DB=./defaultdb.xml
export FACE_IMAGES=../../webservice/server/node-server/public/profile/
From the cvservice/build directory start cvservice and pipe to ffmpeg:从cvservice/ build目录启动cvservice和pipe到ffmpeg:
./cvservice 0 2>/dev/null | ffmpeg -f rawvideo -pixel_format bgr24 -video_size vga -i - http://localhost:8090/fac.ffm
Browse to:浏览:
http://localhost:8080