
精通
英语
和
开源
,
擅长
开发
与
培训
,
胸怀四海
第一信赖
精通
英语
和
开源
,
擅长
开发
与
培训
,
胸怀四海
第一信赖
锐英源精品原创文章,禁止转载和任何形式的非法内容使用,违者必究
This article is for our sponsors at CodeProject. These articles are intended to provide you with information on products and services that we consider useful and of value to developers
Get access to the new Intel® IoT Developer Kit, a complete hardware and software solution that allows developers to create exciting new solutions with the Intel® Galileo and Intel® Edison boards. Visit the Intel® Developer Zone for IoT.
本文适用于CodeProject的赞助商。这些文章旨在为您提供我们认为有用且对开发人员有价值的产品和服务的信息
访问全新的英特尔®物联网开发人员套件,这是一个完整的硬件和软件解决方案,允许开发人员使用英特尔®Galileo和英特尔®Edison开发板创建令人兴奋的新解决方案。访问英特尔®开发人员专区以获取物联网。
Introduction
In previous blog posts [1], [2], we’ve built the Mosquitto MQTT broker on Edison and created a sensor node for sensing motion, temperature, and light level. In this article, we will connect those sensors and actuators to the Mosquitto MQTT server we’ve built to turn those sensors into true IoT sensors.
在之前的博客文章[1],[2]中,我们在Edison上构建了Mosquitto MQTT代理,并创建了一个用于检测运动,温度和光照水平的传感器节点。在本文中,我们将这些传感器和执行器连接到我们构建的Mosquitto MQTT服务器,以将这些传感器转换为真正的物联网传感器。
MQTT is a publish/subscribe protocol built on top of TCP/IP protocol. MQTT is one of the popular protocols being used for M2M (Machine to Machine) communications. The two main components of MQTT are the MQTT clients and the MQTT broker. The MQTT clients publish messages to a particular topic or, subscribe and listen, to a particular topic. The MQTT broker receives all published messages from MQTT publishers and forward the relevant messages to all MQTT subscribers. Subscribers and publishers do not have to be aware of each other, only the topics and messages are relevant. To properly communicate, publishers and subscribers have to agree to use a common topic name and message format.
To publish or subscribe to an MQTT topic, a MQTT client program is needed. In the Mosquitto MQTT distribution, the publishing client is called ‘mosquitto_pub’ and the subscribing client is called ‘mosquitto_sub’.
The screenshot below shows the sequence of activities we’ll be describing next. The red window shows outputs of the ‘mosquitto_sub’ commands and the black window shows the ‘mosquitto_pub’ commands. Commands were labeled so that we can refer to them conveniently.
MQTT是基于TCP / IP协议构建的发布/订阅协议。MQTT是用于M2M(机器到机器)通信的流行协议之一。MQTT的两个主要组件是MQTT客户端和MQTT代理。MQTT客户端将消息发布到特定主题,或者订阅和收听特定主题。MQTT代理接收来自MQTT发布者的所有已发布消息,并将相关消息转发给所有MQTT订阅者。订阅者和发布者不必彼此了解,只有主题和消息是相关的。为了正确沟通,发布者和订阅者必须同意使用共同的主题名称和消息格式。
要发布或订阅MQTT主题,需要MQTT客户端程序。在Mosquitto MQTT发行版中,发布客户端称为“mosquitto_pub”,订阅客户端称为“mosquitto_sub”。
下面的屏幕截图显示了我们接下来要描述的活动顺序。红色窗口显示'mosquitto_sub'命令的输出,黑色窗口显示'mosquitto_pub'命令。标记了命令,以便我们可以方便地引用它们。

The minimal arguments required for the MQTT clients are: the broker IP address, the topic name and for the publishing clients, the message. Assuming that we already have an MQTT broker running on 127.0.0.1 (localhost), the command below will listen to all messages published to a topic named ‘edison/hello’
MQTT客户端所需的最小参数是:代理IP地址、主题名称、发布客户端和消息。假设我们已经在127.0.0.1(localhost)上运行了MQTT代理,下面的命令将监听发布到名为'edison / hello'主题的所有消息
To publish to the topic ‘edison/hello’: 要发布到'edison / hello'主题:
When the MQTT broker receives the publication to topic ‘edison/hello’ with the message ‘Message#1: Hello World’ from the publishing client (pub3), it scans for subscribers that was listening to the topic ‘edison/hello’. Having found that the subscribing client, (sub3) was listening to the same topic, the MQTT broker forward the message to (sub3). When subscribing client (sub3) receives the message, it echo the message content to the terminal window. In the (sub 3) and (pub 3) commands, the default MQTT port number was implicitly assumed to be 1883 and was not specificed on the commandline. In (sub 4) and (pub 4) commands, the port number is explicitly provided. In (sub 5) and (pub 5) commands, the option ‘-v’ was added to the subscription argument to enable printing of the topic name as well as the message. This will be useful when subscribing to multiple topics using wildcards. The subscription client is persistent, so that additional messages published to the topic ‘edison/hello’ in command (pub 6) will be seen by the subscription client.
当MQTT代理从发布客户端(pub3)收到向主题'edison / hello' 发布的消息“Message#1:Hello World”时,它会扫描正在收听主题'edison / hello'的订阅者。在发现订阅客户端(sub3)正在侦听相同主题之后,MQTT代理将消息转发到(sub3)。当订阅客户端(sub3)接收到消息时,它将消息内容回显到终端窗口。在(sub 3)和(pub 3)命令中,默认的MQTT端口号被隐式假设为1883,并且未在命令行上进行特定。在(sub 4)和(pub 4)命令,显式提供端口号。在(sub 5)和(pub 5)命令中,选项'-v'被添加到subscription参数中,以启用主题名称和消息的打印。在使用通配符订阅多个主题时,这将非常有用。订阅客户端是持久性的,因此订阅客户端将看到发布到命令(pub 6)中的主题“edison / hello”的其他消息。
The default MQTT broker behavior is to discard the message as soon as it was delivered to subscribing clients. When a new topic ‘edison/hello1’ was published by client (pub 7), subscribing client (sub 5) was listening to the topic ‘edison/hello’, hence was not informed. The subscribing client then subscribes to the new topic (sub 6), the previous message published to the topic ‘edison/hello1’ was already discarded. It will receive subsequent publish to ‘edison/hello1’ topic as shown in command (pub 8). There are additional options to tell the MQTT broker to retain the last message published to a topic as well as other QOS (Quality of Service) directives on how messages should be delivered by the broker. More details on these capabilities can be found at the MQTT Wiki site.
Depending on the configuration of the ports, additional arguments may be needed. We will discuss these later in this document.
默认的MQTT代理行为是在将消息传递给订阅客户端后立即丢弃该消息。当客户端(pub 7)发布新主题'edison / hello1'时,订阅客户端(sub 5)正在收听主题'edison / hello',因此未被通知。订阅客户端然后订阅新主题(sub 6),发布到主题'edison / hello1'的先前消息已被丢弃。它将接收后续发布到'edison / hello1'主题,如命令所示(pub 8)。还有其他选项可以告诉MQTT代理保留发布到主题的最后一条消息,以及有关代理如何传递消息的其他QOS(服务质量)指令。有关这些功能的更多详细信息,请访问MQTT Wiki站点。
根据端口的配置,可能需要其他参数。我们将在本文档后面讨论这些内容。
Usually, one would have an MQTT client subscribing to multiple topics from a publisher and perform certain action based on the message received. It is worth a few words discussing how MQTT topic are organized.
MQTT topics are organized in a directory structure with the ‘/’ character used to indicate sub-topics. The listing below are examples of various topics:
通常,会有一个MQTT客户端订阅来自发布者的多个主题,并根据收到的消息执行某些操作。讨论如何组织MQTT主题值得一谈。
MQTT主题在目录结构中组织,其中'/'字符用于指示子主题。以下列表是各种主题的示例:
A subscribers can subscribe to one single topic, such as ‘Temperature/Outdoor/West’ or to multiple topics using wildcards. There are two wildcard characters in MQTT ‘+’ and ‘#’. The ‘+’ wildcard is used to subscribe to topics at the same hierarchical level. The ‘#’ wildcard is used to subscribe to all sub-topics below the specified topics. For example, subscribing to the topic ‘Temperature/#’ will return result when any of the topics in above list have a new message. Subscribing to ‘Temperature/+’ will return only ‘Temperature/Average’ since all other entries are sub-topic. More details on MQTT data organization can be found on the MQTT wiki site.
订阅者可以使用通配符订阅一个主题,例如“Temperature / Outdoor / West”或多个主题。MQTT'+'和'#'中有两个通配符。“+”通配符用于订阅同一层级的主题。'#'通配符用于订阅指定主题下的所有子主题。例如,当上面列表中的任何主题都有新消息时,订阅主题“Temperature /#”将返回结果。订阅'Temperature / +'将仅返回'Temperature / Average',因为所有其他条目都是子主题。有关MQTT数据组织的更多详细信息,请访问MQTT wiki站点。
There are basically 4 methods to connect a MQTT client to the Mosquitto server.
To configure a secure Mosquitto MQTT broker, use the configuration directives shown below. The certificate we used in this case is a self-signed certificate for testing purpose and should not be used in production servers.
基本上有4种方法可以将MQTT客户端连接到Mosquitto服务器。
要配置安全的Mosquitto MQTT代理,请使用下面显示的配置指令。我们在这种情况下使用的证书是用于测试目的的自签名证书,不应在生产服务器中使用。
listener 1995
# port 1995 is the TLS-PSK secure port, client must provide
# --psk-identity and --psk to access
psk_file /home/mosquitto/conf/pskfile.txt
# psk_hint must be present or port 1995 won't work properly
psk_hint hint
listener 1994
# port 1994 is the SSL secure port, client must present
# a certificate from the certificate authority that this server trust
# e.g. ca.crt
cafile /home/mosquitto/certs/ca.crt
certfile /home/mosquitto/certs/server.crt
keyfile /home/mosquitto/certs/server.key
The file, pwdfile.txt, is a password file, encrypted in similar manner as the Linux password file. It is generated by using the mosquitto_passwd utility that comes with the Mosquitto software. The file pskfile.txt, is the pre-shared password file to be used in a TLS-PSK connection. The format of this file is a text file of one user:password pair per line. The passwords used for TLS-PSK must use only hexadecimal characters and are case insensitive. Sample of the password_file and psk_file is shown below.
文件pwdfile.txt是一个密码文件,加密方式与Linux密码文件类似。它是使用Mosquitto软件附带mosquitto_passwd的实用程序生成的。文件pskfile.txt是要在TLS-PSK连接中使用的预共享密码文件。此文件的格式是一个用户的文本文件:每行一个密码对。用于TLS-PSK的密码必须仅使用十六进制字符,并且不区分大小写。password_file和psk_file的示例如下所示。
Since the Edison board is really a Linux board that ran an Arduino sketch as one of its processes, we will leverage the existing Mosquitto MQTT package we previously built. Within the Arduino sketch, we will simply use Linux programming facilities to call the ‘mosquitto_sub’ and ‘mosquitto_pub’ programs. There are several advantages to this approach: 由于Edison主板实际上是一个将Arduino草图作为其过程之一运行的Linux主板,因此我们将利用我们之前构建的现有Mosquitto MQTT包。在Arduino草图中,我们将简单地使用Linux编程工具来调用' mosquitto_sub'和' mosquitto_pub'程序。这种方法有几个优点:
Since the Intel Edison board is a full-fledged Linux operating system, all of the Linux programming facilities are available to our Arduino sketches. We will create a wrapper class called MQTTClient that will be used in the sketch. Within the MQTTClient methods, we will use Linux system calls to invoke the mosquitto_sub and mosquitto_pub program that will perform the actual MQTT data transfer for us. Below is the class definition for a minimalist MQTTClient.
由于英特尔Edison主板是一个成熟的Linux操作系统,所以我们的Arduino草图都可以使用所有Linux编程工具。我们将创建一个名为MQTTClient的包装类,它将在草图中使用。在MQTTClient方法里,我们将使用Linux系统调用来调用mosquitto_sub和mosquitto_pub将执行实际MQTT数据传输给我们的程序。下面是极简主义MQTTClient的类定义。
#ifndef __MQTTClient_H__
#define __MQTTClient_H__
#include <Arduino.h>
#include <stdio.h>
enum security_mode {OPEN = 0, SSL = 1, PSK = 2};
class MQTTClient {
public:
MQTTClient();
~MQTTClient();
void begin(char * broker, int port, security_mode mode,
char* certificate_file, char *psk_identity, char *psk);
boolean publish(char *topic, char *message);
boolean subscribe(char* topic, void (*callback)(char *topic, char* message));
boolean loop();
boolean available();
void close();
private:
void parseDataBuffer();
FILE* spipe;
char mqtt_broker[32];
security_mode mode;
char topicString[64];
char certificate_file[64];
char psk_identity[32];
char psk_password[32];
int serverPort;
char *topic;
char *message;
boolean retain_flag;
void (*callback_function)(char* topic, char* message);
char dataBuffer[256];
};
#endif
To use the class, one starts with creating an MQTTClient object, then use MQTTClient::begin() to initialize various variables that MQTTClient::subscribe() and MQTTClient::publish() will use to connect with the MQTT broker. These variables are: 要使用这个类,一个开始以创建MQTTClient对象,然后使用MQTTClient::begin()初始化各种变量MQTTClient::subscribe()和MQTTClient::publish()将用来与MQTT经纪人连接。这些变量是:
To subscribe to a topic, one calls MQTTClient::subscribe() with a topic name and a callback function to be invoked when a new message is available. To publish to a topic, one calls MQTTClient::publish() and supply a topic name and message to be publish.
For both subscribe and publish method, the appropriate command string to invoke either mosquitto_sub or mosquitto_pub is formed using the method’s arguments and stored parameters. A Linux pipe is then opened and the command string is executed with results piped back to the Arduino sketch. When publishing, the pipe is immediately closed after the message was sent. When subscribing, the pipe need to be kept open so that new data can be received. Within the Arduino sketch, one needs to periodically check the pipe to see if there is any new data. The MQTTClient::loop() method was designed to check for data in the pipe and invoke the callback function to process new messages. Because the Linux pipe will block if the pipe is empty when checked, we’ve made the pipe non-blocking so that the MQTTClient::loop() method will return if the pipe is empty. Pseudo-code below shows typical usage of the MQTTClient class.
要订阅主题,MQTTClient::subscribe()可以在新消息可用时调用主题名称和回调函数。要发布到主题,可以调用MQTTClient::publish()并提供要发布的主题名称和消息。
对于subscribe和publish方法,调用mosquitto_sub或mosquitto_pub的合适命令字符串是使用方法的参数和存储的参数。然后打开Linux管道并执行命令字符串,并将结果传送回Arduino草图。发布时,管道会在发送消息后立即关闭。订阅时,管道需要保持打开状态,以便可以接收新数据。在Arduino草图中,需要定期检查管道以查看是否有任何新数据。该MQTTClient::loop()方法旨在检查管道中的数据并调用回调函数来处理新消息。因为如果管道在检查时是空的,Linux管道会阻塞,所以我们已经使管道无阻塞了MQTTClient::loop()如果管道为空,则返回方法。下面的伪代码显示了MQTTClient该类的典型用法。
MQTTClient mqttClient;
void setup() {
mqttClient.begin("localhost",1833,PSK,NULL,"psk_user","psk_password");
mqttClient.subscribe("edison/#",myCallBack);
}
void myCallBack(char* topic, char* message) {
// scan for matching topic, scan for matching command, do something useful
}
unsigned long publishTime = millis();
void loop() {
mqttClient.loop(); // check for new message
if (millis() > publishTime) {
publishTime = millis() + PUBLISH_INTERVAL;
mqttClient.publish("edison/sensor1","sensor1value");
mqttClient.publish("edison/sensor2","sensor2value");
}
delay(SAMPLING_PERIOD);
}
The variable "SAMPLING_PERIOD” determines the frequency the code will check for new messages and should be chosen such that a new message that will cause some action from the sketch will not arrive too late for meaningful actions. Most of the time, MQTTClient::loop() method will return quickly and there is minimal overhead in sampling the loop frequently. The publication interval is determined by the variable "PUBLISH_INTERVAL” and should be chosen at the appropriate data rate for the given sensor e.g. a temperature sensor may publish its value once a minute if it is merely for informational purpose while a smoke sensor may want to update its result every few seconds so that a subscriber listening to the smoke sensor messages will have a chance to act before it is too late.
An implementation of the MQTTClient class is shown below.
变量“ SAMPLING_PERIOD”确定代码检查新消息的频率,并且应该选择这样一条新消息,这将导致草图中的某些动作不会太晚到达有意义的动作。大多数时候,MQTTClient::loop()方法将快速返回并且频繁采样循环的开销最小。发布间隔由变量“ PUBLISH_INTERVAL”确定,应根据给定传感器的适当数据速率选择,例如温度传感器可以每分钟发布一次,如果它仅用于信息目的是烟雾传感器可能希望每隔几秒更新一次结果,以便收听烟雾传感器信息的用户有机会在太晚之前采取行动。
MQTTClient该类的实现如下所示。
// File: MQTTClient.cpp
#include "MQTTClient.h"
#include <fcntl.h>
/*======================================================================
Constructor/Destructor
========================================================================*/
MQTTClient::MQTTClient()
{
}
MQTTClient::~MQTTClient()
{
close();
}
void MQTTClient::close()
{
if (spipe) {
fclose(spipe);
}
}
/*========================================================================
Initialization. Store variables to be used for subscribe/publish calls
==========================================================================*/
void MQTTClient::begin(char *broker, int port, security_mode smode,
char* cafile, char *user, char *psk)
{
strcpy(mqtt_broker, broker);
serverPort = port;
mode = smode;
if (mode == SSL) {
strcpy(certificate_file, cafile);
}
else if (mode == PSK) {
strcpy(psk_identity, user);
strcpy(psk_password, psk);
}
Serial.println("MQTTClient initialized");
Serial.print("Broker: "); Serial.println(mqtt_broker);
Serial.print("Port: "); Serial.println(serverPort);
Serial.print("Mode: "); Serial.println(mode);
}
/*=======================================================================
Subscribe to a topic, (*callback) is a function to be called when client
receive a message
=========================================================================*/
boolean MQTTClient::subscribe(char* topic,
void (*callback)(char* topic, char* message))
{
char cmdString[256];
if (mqtt_broker == NULL) {
return false;
}
if (topic == NULL) {
return false;
}
callback_function = callback;
switch(mode) {
case OPEN:
sprintf(cmdString,
"mosquitto_sub -h %s -p %d -t %s -v",
mqtt_broker, serverPort, topic);
break;
case SSL:
sprintf(cmdString,
"mosquitto_sub -h %s -p %d -t %s -v --cafile %s",
mqtt_broker, serverPort, topic, certificate_file);
break;
case PSK:
sprintf(cmdString,
"mosquitto_sub -h %s -p %d -t %s -v --psk-identity %s --psk %s",
mqtt_broker, serverPort, topic, psk_identity, psk_password);
break;
default:
break;
}
if ((spipe = (FILE*)popen(cmdString, "r")) != NULL) {
// we need to set the pipe read mode to non-blocking
int fd = fileno(spipe);
int flags = fcntl(fd, F_GETFL, 0);
flags |= O_NONBLOCK;
fcntl(fd, F_SETFL, flags);
strcpy(topicString, topic);
return true;
}
else {
return false;
}
}
/*====================================================================
Check if there is data in the pipe,
if true, parse topic and message and execute callback function
return if pipe is empty
======================================================================*/
boolean MQTTClient::loop()
{
if (fgets(dataBuffer, sizeof(dataBuffer), spipe)) {
parseDataBuffer();
callback_function(topic, message);
}
}
/*====================================================================
Publish a message on the given topic
======================================================================*/
boolean MQTTClient::publish(char *topic, char *message)
{
FILE* ppipe;
char cmdString[256];
boolean retval = false;
if (this->mqtt_broker == NULL) {
return false;
}
if (topic == NULL) {
return false;
}
switch (this->mode) {
case OPEN:
sprintf(cmdString,
"mosquitto_pub -h %s -p %d -t %s -m \"%s\" %s",
mqtt_broker, serverPort, topic, message, retain_flag?"-r":"");
break;
case SSL:
sprintf(cmdString,
"mosquitto_pub -h %s -p %d --cafile %s -t %s -m \"%s\" %s",
mqtt_broker, serverPort, certificate_file,
topic, message, retain_flag?"-r":"");
break;
case PSK:
sprintf(cmdString,
"mosquitto_pub -h %s -p %d --psk-identity %s --psk %s -t %s -m \"%s\" %s",
mqtt_broker, serverPort, psk_identity, psk_password,
topic, message, retain_flag?"-r":"");
break;
}
if (!(ppipe = (FILE *)popen(cmdString, "w"))) {
retval = false;
}
if (fputs(cmdString, ppipe) != EOF) {
retval = true;
}
else {
retval = false;
}
fclose(ppipe);
return retval;
}
/*======================================================================
Parse data in the data buffer to topic and message buffer
delimiter is the first space
if there is only one recognizable string, it is assumed a message
string and topic is set to NULL
========================================================================*/
void MQTTClient::parseDataBuffer()
{
topic = dataBuffer;
message = dataBuffer;
while((*message) != 0) {
if ((*message) == 0x20) {
// replace the first space with the NULL character
(*message) = 0;
message++;
break;
}
else {
message++;
}
}
if (strlen(message) == 0) {
topic = NULL;
message = dataBuffer;
}
}
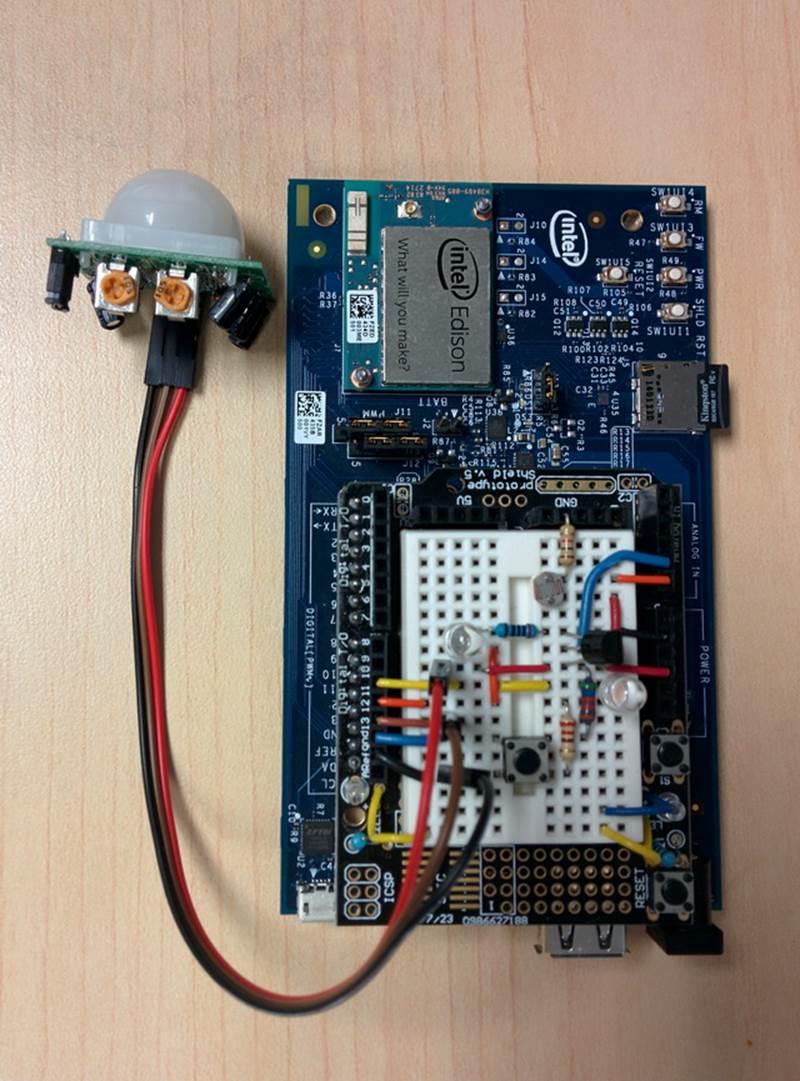
In the blog posting "Using Intel Edison: Building an IoT Sensor Node”, we built a sensor node with a few sensors and actuators:
在博客文章“使用英特尔Edison:构建物联网传感器节点”中,我们构建了一个带有几个传感器和执行器的传感器节点:
Using MQTT, we will periodically publish various sensor readings to the Mosquitto broker running on the same Edison board and subscribe to all topics, ‘edison/#’. We made slight changes to the operation of the sensor node:
The main Arduino sketch is shown below.
使用MQTT,我们将定期向运行在同一Edison板上的Mosquitto代理发布各种传感器读数,并订阅所有主题'edison /#'。我们对传感器节点的操作稍作修改:
主要的Arduino草图如下所示。
/******************************************************************************
Internet of Thing Sensor Node using Intel Edison Development board
******************************************************************************/
#include <stdio.h>
#include <Arduino.h>
#include "sensors.h"
#include "MQTTClient.h"
// Global variables
unsigned long updateTime = 0;
// PIR variables
volatile unsigned long activityMeasure;
volatile unsigned long activityStart;
volatile boolean motionLED = true;
unsigned long resetActivityCounterTime;
// button variables
boolean toggleLED = false;
volatile unsigned long previousEdgeTime = 0;
volatile unsigned long count = 0;
volatile boolean arm_alarm = false;
// MQTT Client
#define SECURE_MODE 2
MQTTClient mqttClient;
char fmtString[256]; // utility string
char topicString[64]; // topic for publishing
char msgString[64]; // message
/*****************************************************************************
Setup
******************************************************************************/
void setup() {
Serial.begin(115200);
delay(3000);
Serial.println("Ready");
pinMode(RED_LED, OUTPUT);
pinMode(GREEN_LED, OUTPUT);
pinMode(BUTTON, INPUT_PULLUP);
pinMode(PIR_SENSOR, INPUT);
// Button interrupt. Trigger interrupt when button is released
attachInterrupt(BUTTON, buttonISR, RISING);
// PIR interrupt. We want both edges to compute pulse width
attachInterrupt(PIR_SENSOR, pirISR, CHANGE);
digitalWrite(RED_LED, HIGH);
digitalWrite(GREEN_LED,LOW);
resetActivityCounterTime = 0;
// initializing MQTTClient
#if ( SECURE_MODE == 0 )
Serial.println("No security");
mqttClient.begin("localhost", 1883, OPEN, NULL, NULL, NULL);
#elif ( SECURE_MODE == 1 )
Serial.println("SSL security");
mqttClient.begin("localhost", 1994, SSL,
"/home/mosquitto/certs/ca.crt", NULL, NULL);
#elif ( SECURE_MODE == 2 )
Serial.println("TLS-PSK security");
mqttClient.begin("localhost", 1995, PSK, NULL, "user", "deadbeef");
#endif
// subscribe to all topics published under edison
mqttClient.subscribe("edison/#", mqttCallback);
mqttClient.publish("edison/bootMsg","Booted");
digitalWrite(RED_LED, LOW);
}
/**************************************************************************
MQTT Callback function
**************************************************************************/
void mqttCallback(char* topic, char* message)
{
sprintf(fmtString, "mqttCallback(), topic: %s, message: %s",topic,message);
Serial.print(fmtString);
// check for matching topic first
if (strcmp(topic,"edison/LED") == 0) {
// then execute command as appropriate
if (message[0] == 'H') {
digitalWrite(RED_LED, HIGH);
toggleLED = false;
}
else if (message[0] == 'L') {
digitalWrite(RED_LED, LOW);
toggleLED = false;
}
else if (message[0] == 'B') {
toggleLED = true;
}
}
if (strcmp(topic, "edison/motionLED") == 0) {
// note that there is an extra carriage return at the end of the message
// using strncmp to exclude the last carriage return
if (strncmp(message, "OFF", 3) == 0) {
digitalWrite(GREEN_LED, LOW);
motionLED = false;
}
else if (strncmp(message, "ON", 2) == 0) {
motionLED = true;
}
}
}
/***********************************************************************
Main processing loop
***********************************************************************/
void loop() {
// check for any new message from mqtt_sub
mqttClient.loop();
if (millis() > resetActivityCounterTime) {
resetActivityCounterTime = millis() + 60000;
// publish motion level
sprintf(msgString,"%.0f",100.0*activityMeasure/60000.0);
mqttClient.publish("edison/ActivityLevel",msgString);
activityMeasure = 0;
}
if (millis() > updateTime) {
updateTime = millis() + 10000;
// publish temperature
sprintf(msgString,"%.1f",readTemperature(TEMP_SENSOR));
mqttClient.publish("edison/Temperature",msgString);
// publish light sensor reading
sprintf(msgString,"%d",readLightSensor(LIGHT_SENSOR));
mqttClient.publish("edison/LightSensor",msgString);
// publish arm_alarm
sprintf(msgString,"%s", (arm_alarm == true)? "ARMED" : "NOTARMED");
mqttClient.publish("edison/alarm_status", msgString);
}
if (toggleLED == true) {
digitalWrite(RED_LED, digitalRead(RED_LED) ^ 1);
}
delay(100);
}
Much of the code is self-explanatory. We have moved the sensors processing code to separate modules: sensors.h and sensors.cpp to improve readability. We allow for different security modes to be used by setting the SECURE_MODE variable in the main Arduino sketch. The callback function, mqttCallback(), is called whenever there is a new message from the MQTT broker. Subscribed MQTT topic name and message are passed to the callback function where they are scanned and acted upon if any of them match a set of pre-defined action. The callback function is the main mechanism to control the IOT sensor from the internet. In this case, messages published to topic ‘edison/LED’ is used to turn the red LED on, off, or blink and messages published to topic ‘edison/motionLED’ is used to control the behavior of the green LED to either track the motion sensor output or not. 大部分代码都是不言自明的。我们已将传感器处理代码移至单独的模块:sensors.h和sensors.cpp,以提高可读性。我们允许通过SECURE_MODE在主Arduino草图中设置变量来使用不同的安全模式。mqttCallback()只要有来自MQTT代理的新消息,就会调用回调函数。订阅的MQTT主题名称和消息将传递给回调函数,在回调函数中,如果它们中的任何一个与一组预定义的操作匹配,则会对其进行扫描和操作。回调函数是从互联网控制IOT传感器的主要机制。在这种情况下,发布到主题'edison / LED'的消息用于打开,关闭或闪烁红色LED以及发布到主题的消息'edison / motionLED'用于控制绿色LED的行为,以跟踪运动传感器输出。
#define RED_LED 10 // Red LED
#define GREEN_LED 11 // Green LED
#define BUTTON 13 // push button with 10K pull up resistor
#define PIR_SENSOR 12 // Infrared motion sensor
#define LIGHT_SENSOR A0 // light sensor
#define TEMP_SENSOR A1 // TMP36 or LM35 analog temperature sensor
#define MIN_PULSE_SEPARATION 200 // for debouncing button
#define ADC_STEPSIZE 4.61 // in mV, for temperature conversion.
#if (USE_TMP036 == 1)
#define TEMP_SENSOR_OFFSET_VOLTAGE 750
#define TEMP_SENSOR_OFFSET_TEMPERATURE 25
#else // LM35 temperature sensor
#define TEMP_SENSOR_OFFSET_VOLTAGE 0
#define TEMP_SENSOR_OFFSET_TEMPERATURE 0
#endif
// Global variables
extern unsigned long updateTime;
// PIR variables
extern volatile unsigned long activityMeasure;
extern volatile unsigned long activityStart;
extern volatile boolean motionLED;
extern unsigned long resetActivityCounterTime;
// button variables
extern boolean toggleLED;
extern volatile unsigned long previousEdgeTime;
extern volatile unsigned long count;
extern volatile boolean arm_alarm;
float readTemperature(int analogPin);
int readLightSensor(int analogPin);
void buttonISR();
void pirISR();
To test the IoT sensor, we’ll need to use an MQTT client to subscribe to the topics published by the sensor, and another MQTT client to publish topics that the sensor will response to. We can use ‘SSH’ to log into the Edison board and use the mosquitto_sub/pub command to observe and control the sensor node locally or we can use a different host that also have the Mosquitto package installed.
To test the sensor node:
On the subscribing client, subscribe to all topics
要测试IoT传感器,我们需要使用MQTT客户端来订阅传感器发布的主题,并使用另一个MQTT客户端来发布传感器将响应的主题。我们可以使用“SSH”登录Edison板并使用该mosquitto_sub/pub命令在本地观察和控制传感器节点,或者我们可以使用另外安装了Mosquitto软件包的主机。
要测试传感器节点:
在订阅客户端上,订阅所有主题
Where ipaddr is the IP address of the Edison board. Substitute "localhost” if running on the Edison board itself. We use the open port, 1883, to connect to the broker in this case. We can also use port 1994 with a certificate or port 1995 with PSK user name and password. After successfully subscribe to topic ‘edison/#’, we should see the sensor readings along with any commands issued through the publishing client.
On the publishing client, publish to topic edison/LED to control the red LED or to Edison/motionLED to enable/disable the green LED
Ipaddr是Edison电路板的IP地址。如果在Edison板上运行,则替换“localhost”。在这种情况下,我们使用开放端口1883连接到代理。我们也可以使用带有PSK用户名和密码的端口1994和证书或端口1995。订阅主题'edison /#',我们应该看到传感器读数以及通过发布客户端发出的任何命令。
在发布客户端上,发布到主题edison / LED以控制红色LED或发布到Edison / motionLED以启用/禁用绿色LED
$> mosquitto_pub –h ipaddr –p 1883 –t Edison/LED –m {H, L, B}
$> mosquitto_pub –h ipaddr –p 1883 –t Edison/motionLED –m {ON, OFF}
The red LED should turn ON, OFF or blink when each of the command above was published.
To stop the green LED from tracking the motion sensor, publish to topic ‘edison/motionLED’ with the message ON or OFF.
The attached video shows the screencast of the testing process.
发布上述每个命令时,红色LED应亮起,亮起或闪烁。
要停止绿色LED跟踪运动传感器,请使用ON或OFF消息发布到主题'edison / motionLED'。
附带的视频显示了测试过程的截屏视频。