
精通
英语
和
开源
,
擅长
开发
与
培训
,
胸怀四海
第一信赖
精通
英语
和
开源
,
擅长
开发
与
培训
,
胸怀四海
第一信赖
锐英源精品开源心得,转载请注明:“锐英源www.wisestudy.cn,孙老师作品,电话13803810136。”需要全文内容也请联系孙老师。
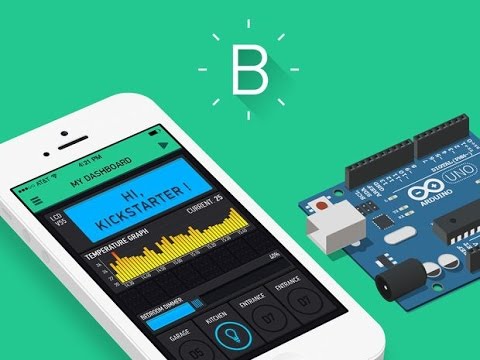
When we talk about top trending keywords in technology nowadays, we can't forget the "Internet of Things". With the development of the internet, IoT has to play an important role. That's why I'm going to write a small article about IoT. The simplest things we can start with is controlling lights via the Internet. In this article, I'll control LEDs on/off. From this start, you can control lights, fans, air-condition, etc, in your house. But with these AC appliances, you'll need relays to turn them on/off.
当我们谈论当今技术中最热门的关键词时,我们不能忘记“物联网”。随着互联网的发展,物联网必须发挥重要作用。这就是为什么我要写一篇关于物联网的小文章。我们可以开始的最简单的事情是通过互联网控制灯光。在本文中,我将控制LED的开/关。从一开始,您就可以在家中控制灯光、风扇和空调等。但是使用这些AC设备,您需要继电器来打开/关闭它们。
The Internet of Things (IoT) is the network of physical devices, vehicles, home appliances, and other items embedded with electronics, software, sensors, actuators, and connectivity which enables these things to connect and exchange data, creating opportunities for more direct integration of the physical world into computer-based systems, resulting in efficiency improvements, economic benefits, and reduced human exertions. (Wikipedia)
As you know, we can't decline the important role of the IoT in our lives. It helps us in different industries. I believe that it'll have a great development in the future by your distribution.
物联网(IoT)是一套网络,这个网络里包含物理设备、车辆、家用电器、嵌入有电子元件设备、软件、传感器、执行器和交换数据的连接,为更直接的集成创造机会将物理世界变为基于计算机的系统,从而提高效率,提高经济效益,减少人力消耗。(维基百科)
如您所知,我们不能拒绝物联网在我们生活中的重要作用。它帮助我们在不同的行业。我相信你的发行将来会有很大的发展。
An IoT system includes four components: sensors, connectivity, data processing and a user interface.
物联网系统包括四个组件:传感器,连接,数据处理和用户界面。
Now, let's start our project. The first thing we should do is to prepare some components.
现在,让我们开始我们的项目。我们应该做的第一件事是准备一些组件。
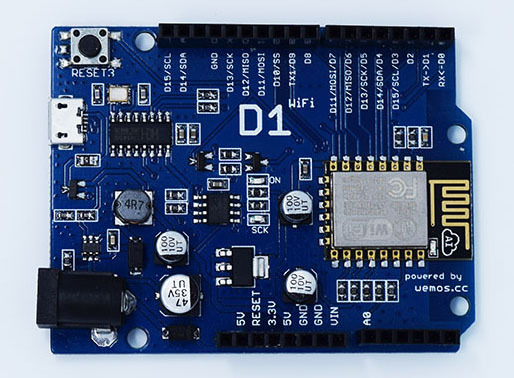
Firstly, we need something to connect devices (lights, fans, etc.) to the Internet and then we can control them from any place via the Internet. Obviously, a board that can connect the Wifi is required. One of them is Wemos D1. This board includes ESP8266 module and it's around $12. Let's see it on Amazon here.
On the left of this board is ESP 8266 Wifi chip. It's used to connect, receive and send data through Wifi. We use this chip to get access to Wifi in the house. Then, we'll send the controlling statement via Wifi to have control of all the devices. See the following datasheet:
首先,我们需要一些东西将设备(灯,风扇等)连接到互联网,然后我们可以通过互联网从任何地方控制它们。显然,需要一块可以连接Wifi的主板。其中一个是Wemos D1。该主板包括ESP8266模块,售价约为12美元。我们在这里看看它在亚马逊上。
这块板的左边是ESP 8266 Wifi芯片。它用于通过Wifi连接,接收和发送数据。我们使用这个芯片可以访问家中的Wifi。然后,我们将通过Wifi发送控制语句来控制所有设备。请参阅以下数据表:
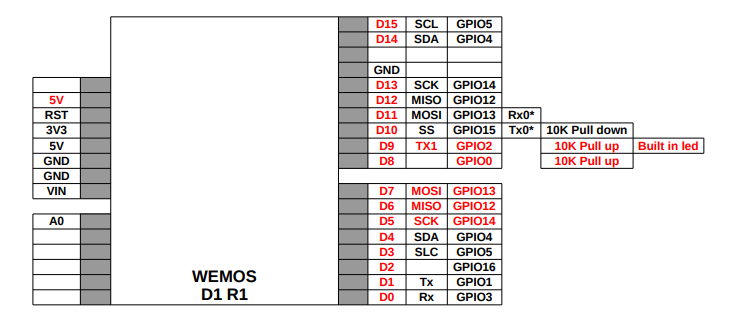
* GND pin, also called LOW leg, we need to connect the cathode of devices to this pin.
* The pins D0 - D15 are the positive pins used to plug into the anode of the device. For example, to control LEDs, we need to plug the long leg of the LED into one of the positive poles. There are also other legs that you can find out more about, but in the basic device controlling, we just use these pins.
* GND引脚,也称为LOW脚,我们需要将器件的阴极连接到此引脚。
*引脚D0-D15是用于插入器件阳极的正极引脚。例如,为了控制LED,我们需要将LED的长腿插入其中一个正极。还有其他腿可以找到更多,但在基本设备控制中,我们只使用这些引脚。
Obviously, we need wires to connect all devices together. There are 3 types of wires: male - male, female - female and male - female. You'll choose suitable wires for your project.
显然,我们需要电线将所有设备连接在一起。有三种类型的电线:公 - 公,母 - 母和公 - 母。您将为您的项目选择合适的电线。

Breadboard is a component that can be used to check principle diagram and the connection of our devices to Wemos D1 easily. We'll put the leds, Wemos board and some wires on it. I'm going to explain how to use breadboard for someone who hasn't heard about it.
It's a hard thing that has a lot of holes on the surface. On two sides, it has red and blue lines to show where you should connect anode or cathode. But they're just the symbol, in fact, you don't need to follow them at all. There are also some numbers on it, 5 10 15 20, etc. It helps us easily see the order of each line of holes.
Let's see the following illustration.
面包板是一个组件,可用于检查原理图和我们的设备与Wemos D1的连接。我们将把LED,Wemos板和一些电线放在上面。我将解释如何使用面包板给没有听说过的人。
在表面上有很多洞是很难的。在两侧,它有红色和蓝色线条,以显示您应该连接阳极或阴极的位置。但它们只是象征,事实上,你根本不需要遵循它们。它上面还有一些数字,5 10 15 20等。这有助于我们轻松查看每一行孔的顺序。
让我们看看下图。
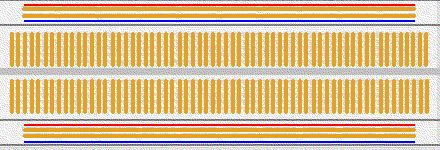
The holes in the breadboard are connected with other ones in the same line. In the illustration, all holes in the same yellow, red or blue line are connected. It's likely a wire. You can put wires, LEDs' legs, sensors' pins into those holes.
面包板上的孔与同一行中的其他孔连接。在图示中,相同的黄色,红色或蓝色线中的所有孔都是连接的。这可能是一根电线。您可以将电线,LED的支脚,传感器的插针插入这些孔中。
'IDE' abbreviation stands for Integrated Development Environment. That is a software suite that consolidates the basic tools developers need to write and test software. Typically, it contains a code editor, a compiler and a debugger that the developer aaccesses through a single graphical user interface.
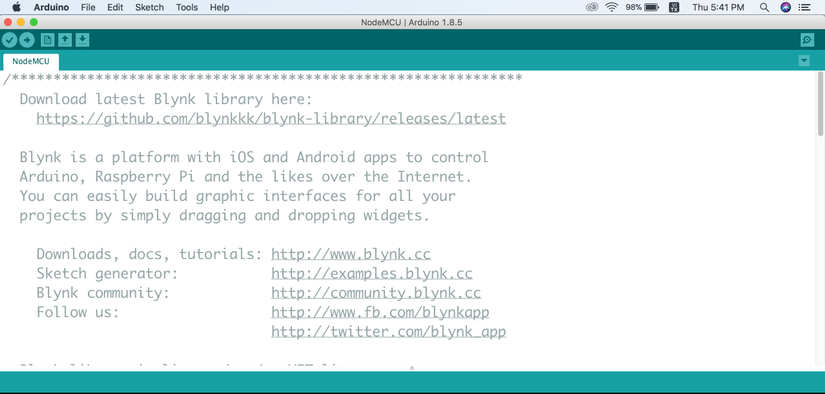
We use Arduino IDE to write and upload code to the Wemos D1 board. We can download it here.
'IDE'缩写代表集成开发环境。这是一个软件套件,它整合了开发人员编写和测试软件所需的基本工具。通常,它包含代码编辑器,编译器和开发人员通过单个图形用户界面访问的调试器。
我们使用Arduino IDE编写代码并将代码上传到Wemos D1板。
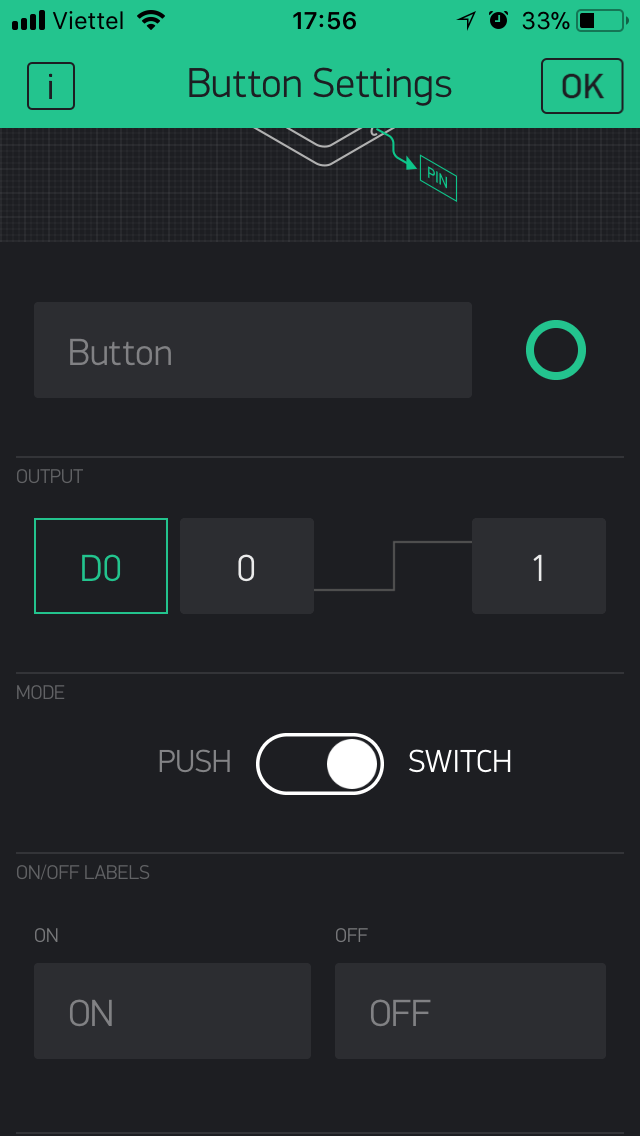
It's an application used to control smart home via MQTT protocol without extra server installation. Blynk provides SDK for ESP 8266 module which we are using. What we need to do is add buttons to control appliances. Click here to install it on Android, or this on iOS. Assuming we are connecting a device at D0 port for which we want to have a control, we'll do a few easy steps on Blynk interface.
它是一个用于通过MQTT协议控制智能家居的应用程序,无需额外的服务器安装。Blynk为我们正在使用的ESP 8266模块提供SDK。我们需要做的是添加按钮来控制设备。点击此处在Android上安装,或在iOS 上安装。假设我们要在D0端口连接我们想要控制的设备,我们将在Blynk接口上执行一些简单的步骤。
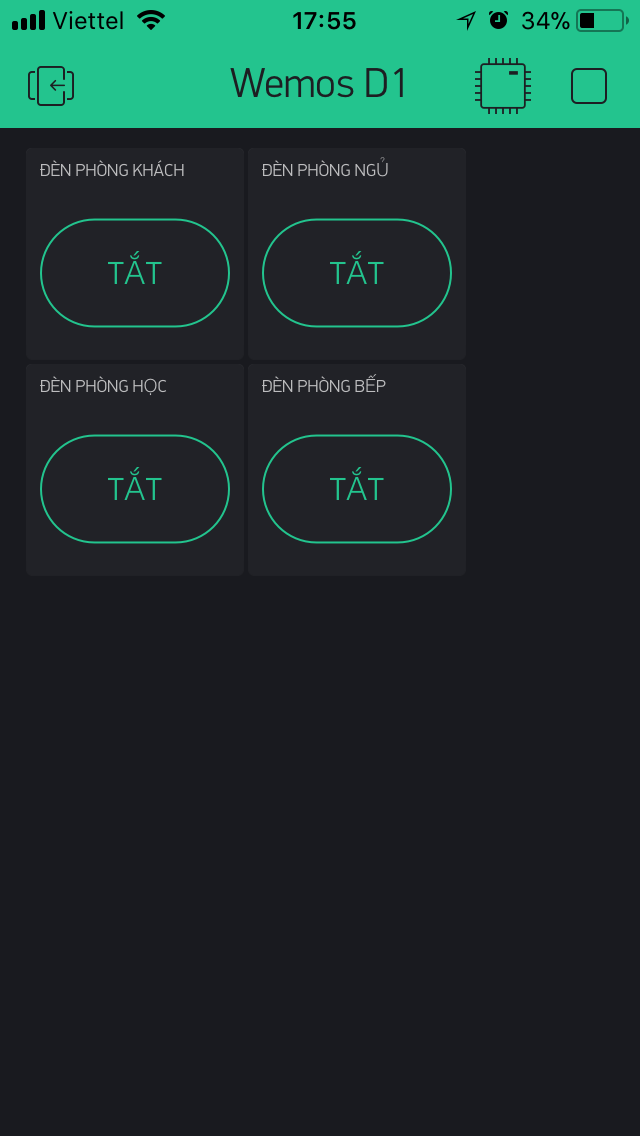
If we have four lights, we'll have a screen like this:如果我们有四个灯,我们将有一个这样的屏幕:
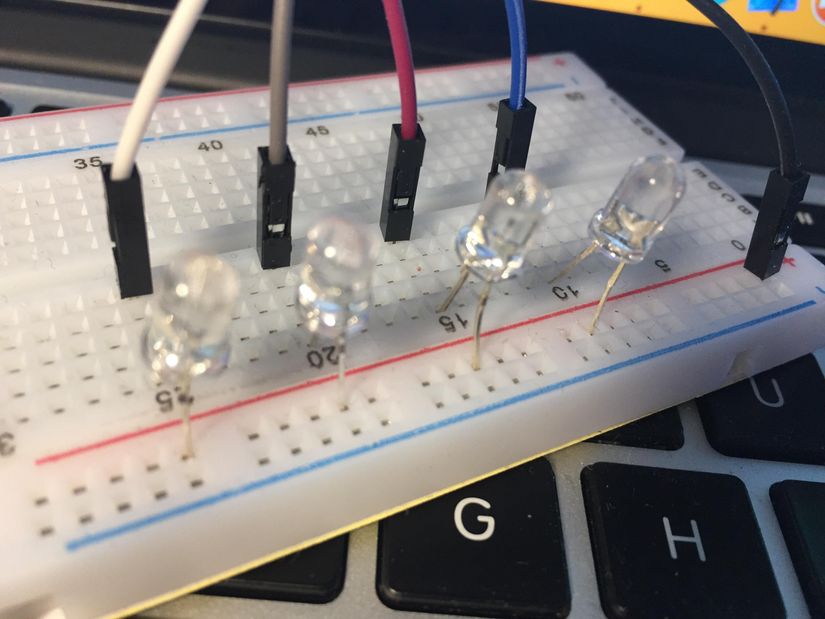
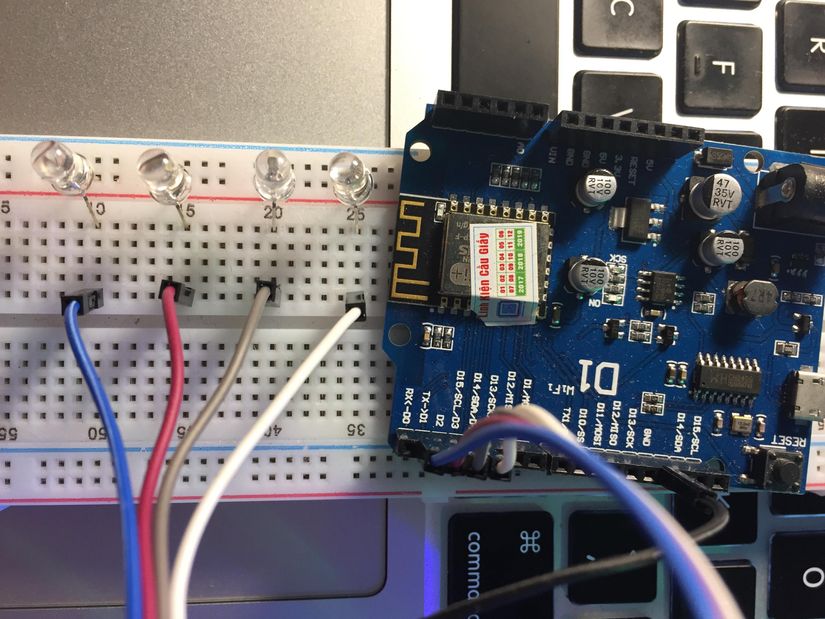
After having some basic knowledge of the diagram and components, let's start gathering them to complete our first simple IoT system. I'm using 4 leds to simulate for 4 appliances in the house. But in fact, in order to control AC appliances, we need relays as well.
Connect leds' anode to line 10, 15, 20 and 25. Anode of leds are the longer legs. And then connect them into D1 to D4 ports, respectively. For cathodes, we connect all of them to GND on Wemos D1. We use male-male wires for these connections.在了解了图表和组件的一些基本知识后,让我们开始收集它们以完成我们的第一个简单的物联网系统。我正在使用4个LED来模拟房子里的4个电器。但实际上,为了控制AC设备,我们也需要继电器。
将LED的阳极连接到10,15,20和25号线.LED的阳极是较长的腿。然后分别将它们连接到D1到D4端口。对于阴极,我们将它们全部连接到Wemos D1上的GND。我们使用公 - 公电线进行这些连接。
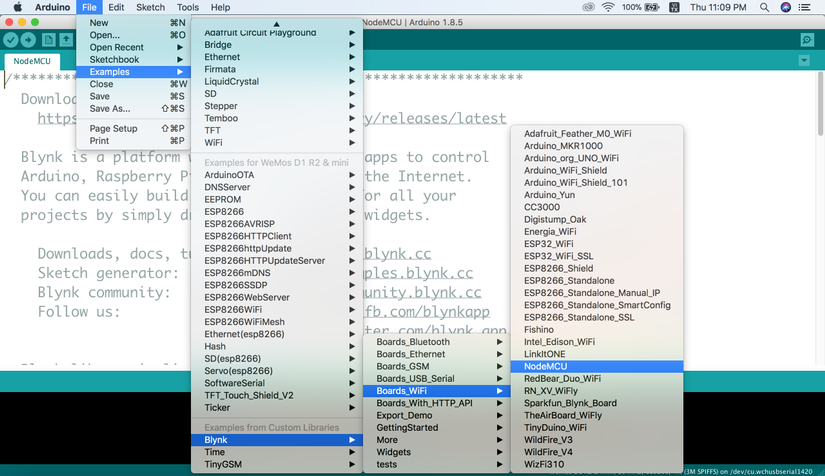
After making a circuit, the final thing we need to do is write some codes and upload them to Wemos D1. As I've said above, the community between hardware and the Internet can be performed via MQTT protocol. This protocol might be a little complicated for beginners, so we will use another solution for this problem, a third party that provides platform for hardware and the Internet, it's Blynk. Blynk supplies SDK directly for Arduino so that you just run it only and do nothing else. You can download Blynk library here. To add the library, go to Sketch -> Include library -> Add .ZIP library and choose the zip file you've just download above.
After installing SDK Blynk for Arduino, we go to the example section like this:
制作电路后,我们需要做的最后一件事是编写一些代码并将它们上传到Wemos D1。如上所述,硬件和Internet之间的社区可以通过MQTT协议执行。这个协议对于初学者来说可能有点复杂,所以我们将使用另一个解决方案来解决这个问题,第三方为硬件和互联网提供平台,它是Blynk。Blynk直接为Arduino提供SDK,因此您只需运行它而不执行任何其他操作。您可以在这里下载Blynk库。要添加库,请转到草图 - >包含库 - >添加.ZIP库,然后选择您刚刚下载的zip文件。
在为Arduino安装SDK Blynk之后,我们转到示例部分,如下所示:
We have a small code below:我们在下面有一个小代码:
                    #define BLYNK_PRINT Serial#include <ESP8266WiFi.h>
                      #include <BlynkSimpleEsp8266.h>// You should get Auth Token in the Blynk App.
                      // Go to the Project Settings (nut icon).
                      char auth[] = "YourAuthToken";
                    // Your WiFi credentials.
                      // Set password to "" for open networks.
                      char ssid[] = "YourNetworkName";
                      char pass[] = "YourPassword";
                      void setup()
                      {
                      // Debug console
                      Serial.begin(9600); Blynk.begin(auth, ssid, pass);
                      // You can also specify server:
                      //Blynk.begin(auth, ssid, pass, "blynk-cloud.com", 8442);
                      //Blynk.begin(auth, ssid, pass, IPAddress(192,168,1,100), 8442);
                      }
                      void loop()
                      {
                      Blynk.run();
                      }
What we'll do next is change some parameters:
Now, let's power the Wemos D1 by plugging it to the computer using USB port and enjoy our project.
我们接下来要做的是改变一些参数:
现在,让我们通过使用USB端口将其插入计算机来为Wemos D1供电并享受我们的项目。
This article aims to make an introduction about IoT for beginners. It's really basic and cheap.
Thank you dandy72, he reminded me one thing that I should tell you about IoT system. This is only an introduction about IoT, so if you find it interesting, you should learn more about the IoT features, especially the IoT's security. It's really dangerous for a system that cannot limit people to access. You can find more about it on the Internet. How about some keywords like "Security of IoT".
I hope that you can make more interesting things with this start. Thank you for reading!!!
本文旨在为初学者介绍物联网。这是非常基本和便宜的。
谢谢dandy72,他提醒我一件事,我应该告诉你关于物联网系统的事情。这只是关于物联网的介绍,所以如果你觉得它很有趣,你应该更多地了解物联网功能,尤其是物联网的安全性。对于不能限制人们访问的系统来说,这是非常危险的。您可以在Internet上找到更多相关信息。像“物联网安全”这样的关键词怎么样?
我希望你能从这个开始做出更多有趣的事情。谢谢你的阅读!