
精通
英语
和
开源
,
擅长
开发
与
培训
,
胸怀四海
第一信赖
精通
英语
和
开源
,
擅长
开发
与
培训
,
胸怀四海
第一信赖
Seeing today’s surveillance tecnologies, it can be concluded that there is a strongly growing industry trend towards replacing analog CCTV (Closed-Circuit Television) with IP (Internet Protocol) systems. Concerning to the fact that some level of protecting homes, working places, possessions and personal safety is inevitable, I’m more and more interested in building customized IP camera solutions. That’s why I’m going to outline one of the most important fields of IP camera programming in the form of this article.
看到今天的监视技术,可以得出的结论,有一个强劲增长的行业趋势,它是用IP(互联网协议)系统取代模拟CCTV(闭路电视)。从事实的某种程度关注上,家庭保护,工作场所,财产和人身安全是不可避免的,我越来越感兴趣构建定制的IP摄像机解决方案。 这就是为什么我要概述IP摄像头编程,它是最重要领域之一本文的形式。
Although any IP camera allows you to view its image in a webbrowser, it doesn’t enable to integrate that into your own website. In this article I’ll show how to build live IP camera streaming into your website to be able to monitor the area that is under video surveillance.For protecting your property by installing an IP surveillance system, a high-quality security IP camera is essentially needed. An IP camera (also called ’network camera’) is a networked digital video camera that transmits data over Internet Protocol. IP cameras are most often used for IP surveillance, a digitized and networked version of closed-circuit television (CCTV). IP cameras use the Internet Protocol used by most Local Area Networks to transmit video across the networks in digital form. It can be transmitted through the public Internet, which allows you to view your camera via any broadband connection available via PC or smartphone.
通过安装一个IP监控系统保护你的财产,一个高质量的安全IP相机本质上是必要的。 IP相机(也称为“网络摄像机”)是一个网络数字摄像机在互联网协议传输数据。 IP摄像机通常用于IP监测、数字化和网络化的版本的闭路电视(CCTV)。 IP摄像机使用互联网协议,协议就是大多数局域网传输视频在网络的数字形式。 它可以通过公共网络传播,它允许您机通过宽带连接以个人电脑或智能手机查看您的相机。
An IP camera has several benefits over analog technology. One of the greatest advantages is that IP cameras allow remote administration from any location. IP cameras has the ability to easily send images and video anywhere with an Internet connection. Progressive scanning enables better quality images extracted from the video, especially for moving targets. Some further benefits and functionalities: digital zoom, adjustable frame rates and resolution to meet specific needs, two-way communication, lower cabling requirements, the ability to send alerts if suspicious activity is detected, support for intelligent video, etc.
一个IP摄像机相对模拟技术有几个好处。 最大的优点之一是,IP相机允许从任何位置远程管理。 IP摄像机有能力轻松地在任何地方发送图片和视频网络连接。 顺序扫描可以从视频中提取高品质图像,尤其是对移动目标。 一些进一步的好处和功能:数码变焦,可调节帧率和分辨率来满足特定需求,双向沟通,降低布线需求,能够检测到可疑活动时发出警报,支持智能视频,等等。
Before purchasing an IP camera, take a little time to discover the IP camera market and select the best one based on your needs. Regardless of their usage, reliability and image quality are the main charasteristics that differentiate good cameras from bad ones. And the features, of course, they come with determine their functionality. (And the functionality determines what kind of developments can be possible in the future, since if your camera doesn't support the required functionality, then you won't be able to implement that on your own.) You can find many comparisons and reviews on the Internet that helps you to choose the best device. For instance, the following figure illustrates some of the most powerful IP network cameras according to the Top10thebest’s review:
采购一个IP相机之前,花一点时间来发现IP相机市场,并选择最好的一个基于您的需要。 不管他们的用法,可靠性和图像质量的主要charasteristics区分相机的好坏。 和特性,当然,他们有确定的功能。 (和功能决定了什么样的发展可以有可能在未来,因为如果你的相机不支持所需要的功能,那么你就不能实现你自己的)。 你可以在互联网上找到很多比较和评论,帮助你选择最好的设备。 例如, 下面的图 说明了一些最强大的IP网络摄像机根据Top10thebest的点评:

Some of the most powerful IP network cameras - Source: 1. 一些最强大的IP网络摄像机 ——来源:1。
In order to address issues of standardization of IP video surveillance, the Open Network Video Interface Forum (ONVIF) industry group has been established in 2008. 为了解决IP视频监控的标准化问题,打开网络视频接口论坛(ONVIF)工业集团成立于2008年。
ONVIF is an IP-based security standard. Quoting of the the official website of ONVIF: ’ONVIF (Open Network Video Interface Forum) is an open industry forum for the development of a global standard for the interface of IP-based physical security products.’ ONVIF is established to act on behalf of the members to facilitate the development of a global open standard for the interface of IP-based physical security products. (Some of the members: AXIS Communications, Bosch, Canon, Cisco, LG, Panasonic, Samsung, Sony, Synology, etc.)
ONVIF是一种基于ip的安全标准。 引用ONVIF的官方网站的话说:“ONVIF(开放网络视频接口论坛)是一个开放的行业论坛发展的全球标准接口,它是基于ip的物理安全产品。 建立“ONVIF代表成员采取行动促进全球发展的开放标准接口的基于ip的物理安全产品。 (一些成员:轴通信、博世、佳能、思科、LG、松下、三星、索尼、Synology,等等)。
On this basis, ONVIF standardizes communication between IP-based physical security; enables interoperability between IP-based physical security products regardless of manufacturer and it is open to all companies and organizations. 在此基础上,ONVIF标准化之间的通信基于ip的物理安全,使基于ip的物理安全产品无论制造商之间的互操作性是开放给所有的公司和组织。
The ONVIF specification defines a common protocol for the exchange of information between network video devices including automatic device discovery, video streaming and intelligence metadata. ONVIF规范定义了一个共同的协议之间的信息交换网络视频设备包括自动设备发现,视频和情报的元数据。
![]()
The ONVIG logo - Source: 4. ONVIG标志 ——来源:4。
Now, after studying the technical background of IP surveillance systems, it’s time to start your IP camera project. To be able to broadcast live IP camera stream to your website, you will need the followings: (1) Webserver, (2) ONVIF SDK, (3) IDE for C# programming. Okay, now let’s see what you need to do with the previous three software.
现在,研究IP监测系统的技术背景之后,是时候开始你的IP相机项目。 能够IP摄像头直播流到你的网站,您需要以下:(1)网络服务器,(2)ONVIF SDK,(3)c#编程IDE。 好了,现在让我们看看你需要做前三个软件。
Concerning that this application will be able to display your IP camera image on a website, a webserver is essentially needed. In order to reach my website in a browser, I used Apache that can be downloaded from the official website of Apache. After you have installed the webserver, you need to establish connection between your IP camera and the webserver. The most simple way for this purpose, if you download my FlashClient.zip source code then copy and paste all contents of its bin-debug folder into the WWW folder of the Apache.
关于这个应用程序将能够在网站上显示你的IP摄像机图像,一个网络服务器本质上是必要的。 在浏览器中以达到我的网站,我使用Apache, Apache的官方网站可以下载 。 您已经安装了网络服务器之后,您需要您的IP摄像机和网络服务器之间建立连接。 最简单的方式为这个目的,如果你下载我的FlashClient.zip代码然后其bin-debug文件夹的所有内容复制并粘贴到Apache的WWW文件夹。
In order to implement any kind of IP camera software there is a need for an IP camera SDK that supports ONVIF. For this purpose I used Ozeki Camera SDK that is based on ONVIF standards so it’s compatible with other standard-based products. You can download the SDK from its official website. For using this SDK the .NET Framework components required to run on the target machine architecture and OS. So is is also needed to download and install the Microsoft .NET Framework 4 web installer package.
为了实现任何IP相机软件需要一个支持ONVIF SDKIP相机。 为此我使用Ozeki相机SDK,它是基于ONVIF标准兼容其他基于标准的产品。 你可以 从其官方网站下载SDK 。 使用这个SDK .NET框架组件需要在目标机器上运行架构和操作系统。 还需要下载和安装微软.NET框架4 网络安装程序包。
As I always use Microsoft Visual Studio for programming in C#, I also use this IDE for this project. It can be obtained from the official website of Microsoft. Since in case of this application it doesn’t needed to display the IP camera image in a Windows Forms Application, it’s enough to create a Console Application. For this purpose you need to create a new Visual Studio project by clicking on the ’New project’ icon. Now you need to add the DLL file (provided by the ONVIF SDK) as a reference to your project. Now only one setting left to do in order to avoid any problems: click on the Project menu and select the [YourApplication'sName] Properties element. After right clicking on the first tab there is an option, called ’Target framework’. Make sure that this setting is ’.NET Framework 4.0’.
我总是使用Microsoft Visual Studio在c#编程,我也为这个项目使用这个IDE。 它可以获得的 微软的官方网站 。 以来的这个应用程序不需要显示的IP摄像机图像在一个Windows窗体应用程序中,这足以创建一个控制台应用程序。 为此你需要创建一个新的Visual Studio项目通过单击“新项目”图标。 现在您需要添加DLL文件(ONVIF SDK提供的)作为参考您的项目。 现在只剩下一个设置,以避免任何问题:点击“项目”菜单中,选择利用[名字]属性元素。 正确后点击第一个选项卡有一个选项,称为“目标框架”。 确保此设置”.NET框架4.0”。
Okay, now your system’s ready to build your own IP Camera project.好了,现在你的系统准备建立自己的IP相机项目。
Now I’m going to show all of the classes that are essentially needed to be able to display the image of your IP camera in your webbowser. Accordingly, three classes will be introduced: MyMediaGateway.cs; MyClient.cs and Program.cs.现在我要给所有的类本质上是需要能够显示你的IP摄像机的图像webbowser。 因此,三个类将介绍: MyMediaGateway.cs ; MyClient.cs 和 Program.cs 。
Below you can see the MyMediaGateway class that allows your application to build the connection between your Console Application and your webserver. This way, you will be able to send data from your website to your C# application. As you can see below, when the application is running it is possible to forward the captured image of the camera to the HTML interface of your website:
下面你将看到 的 MyMediaGateway 类,它允许您的应用程序构建你的控制台应用程序和网络服务器之间的连接。 这样,你就可以从你的网站发送数据到c#应用程序。 正如你所看到的 ,当应用程序正在运行时,它可以捕获的图像的相机转发给你的网站的HTML界面:
using System;
      using System.Collections.Generic;
      using System.Linq;
      using System.Text;
      using System.Threading.Tasks;
      using Ozeki.MediaGateway;
      using Ozeki.Media.IPCamera;
      using Ozeki.MediaGateway.Config;
      using Ozeki.MediaGateway.Service;
    namespace Display_IP_Camera_Stream_On_Website
      {
      public class MyMediaGateway : MediaGateway
      {
      private Dictionary<IClient, MyClient> clients;
      private IStreamService _streamService;
       public event EventHandler<EventArgs> ClientCountChange
       public MyMediaGateway(MediaGatewayConfig config)
      : base(config)
      {
      clients = new Dictionary<IClient, MyClient>();
      }
       #region MediaGateway methods
        public override void OnStart()
      {
      base.OnStart()
       _streamService = GetService<IStreamService>(
       Console.WriteLine("MediaGateway started.");
      }
       public override void OnClientConnect(IClient client, object[] parameters)
      {
      Console.WriteLine(client.RemoteAddress + " client connected to the server with " + client.ClientType);
      if (clients.ContainsKey(client)) return;
      clients.Add(client, new MyClient(client, _streamService));
      ClientChange();
      }
       public override void OnClientDisconnect(IClient client)
      {
      var disconnectedClient = GetClient(client);
      if (disconnectedClient == null)
      return;
       disconnectedClient.DisconnectCamera();
      clients.Remove(client);
      ClientChange();
      }
      private void ClientChange()
      {
      var handler = ClientCountChange;
      if (handler != null)
      ClientCountChange(this, new EventArgs());
      }
       #endregion
       #region Client invokes
      public void CameraConnect(IClient client, string uri)
      Console.WriteLine(client.RemoteAddress + " client IP camera connect " + uri);
       var myClient = GetClient(client)
      if (myClient == null)
      return;
       myClient.ConnectCamera(uri);
      }
       public void CameraDisconnect(IClient client)
      {
      Console.WriteLine(client.RemoteAddress + " client IP camera disconnect.");
       var myClient = GetClient(client);
      if (myClient == null)
      return;
       myClient.DisconnectCamera();
      }
       #endregion
       MyClient GetClient(IClient client)
      {
      return !clients.ContainsKey(client) ? null : clients[client];
      }
      }
      }
As the previous and the next code snippets show, the camera image transmission is based on the MyClient class that is used by the MyMediaGateway class. Below you can see the MyClient class that contains all the necessary methods and members that are needed to build the IP camera connection and to stream its image to your C# application.
前面和下一个代码片段显示,传输是基于 MyClient类,而它被 MyMediaGateway 类使用。 下面你将看到 的 MyClient 类,它包含所有必要的方法和成员,需要构建IP相机连接和传输图片数据流到c#应用程序。
 using System;
      using System.Collections.Generic;
      using System.Linq;
      using System.Text;
      using System.Threading.Tasks;
      using Ozeki.Media.MediaHandlers;
      using Ozeki.Media.IPCamera;
      using Ozeki.Media.MediaHandlers.IPCamera;
      using Ozeki.MediaGateway;
      using Ozeki.MediaGateway.Service;

namespace Display_IP_Camera_Stream_On_Website
      {
      class MyClient
      {
      private IClient _client;
      private IStreamService _streamService;
      private IMediaStream _mediaStream;
      private MediaGatewayVideoReceiver _videoReceiver;
      private MediaConnector _connector;
      private IIPCamera _camera;
       public MyClient(IClient client, IStreamService streamService)
      {
      this._client = client;
      this._streamService = streamService;
      _connector = new MediaConnector();
      }
       internal void ConnectCamera(string uri)
      {
      // Connect to the camera
      if (String.IsNullOrEmpty(uri)) return;
       _camera = IPCameraFactory.GetCamera(uri, "admin", "admin");
      _camera.Start();
       if (_camera == null)
      {
      NotifyCameraStateChanged(IPCameraState.Error);
      return;
      }
      // Notify the client about the camera state
      NotifyCameraStateChanged(IPCameraState.Connected);
       // Start the stream
      var playStreamName = Guid.NewGuid().ToString();
      _mediaStream = _streamService.CreateStream(playStreamName);
      _videoReceiver = new MediaGatewayVideoReceiver(_mediaStream);
       _connector.Connect(_camera.VideoChannel, _videoReceiver);
       // Notify the client about the stream name
      OnPlayRemoteStream(playStreamName);
      }
       internal void DisconnectCamera()
      {
      if (_camera == null) return;
          _camera.Disconnect();
      _connector.Disconnect(_camera.VideoChannel, _videoReceiver);
       _videoReceiver.Dispose();
      _mediaStream.Close() ;
       NotifyCameraStateChanged(IPCameraState.Disconnected);
      }
       private void NotifyCameraStateChanged(IPCameraState state)
      {
      try
      {
      _client.InvokeMethod("OnCameraStateChanged", state);
      }
      catch (Exception ex)
      {
      Console.WriteLine(ex.Message);
      }
     }
      void OnPlayRemoteStream(string streamName)
      {
      try
      {
      _client.InvokeMethod("OnPlayRemoteStream", streamName);
      }
      catch (Exception ex)
      {
      Console.WriteLine(ex.Message);
      }
      }
      }
      }
And finally take a look at the Program.cs class that controls the whole process. As you can see below, in the Main section you need to create a MediaGateway type of object and add the FlashConfig element. (The above-mentioned Flash content contains all the rest of the C# source code.)
最后看一看 Program.cs 类,控制整个生产过程。 正如你所看到的 ,在 主要 您需要创建一个部分 MediaGateway 类型的对象和添加 FlashConfig 元素。 (上述Flash内容包含所有其余的c#源代码。)
using System;
      using System.Collections.Generic;
      using System.Linq;
      using System.Text;
      using Ozeki.Media.MediaHandlers.IPCamera;
      using Ozeki.Media.MediaHandlers.IPCamera.Types;
      using Ozeki.Media.Video;
      using Ozeki.Media.Video.Controls;
      using Ozeki.MediaGateway.Config;
      namespace Display_IP_Camera_Stream_On_Website
      {
     class Program
      {
      static void Main(string[] args)
      {
      var config = new MediaGatewayConfig();
      config.AddConfigElement(new FlashConfig { ServiceName = "IPCameraServer" });
       MyMediaGateway _mediaGateway = new MyMediaGateway(config);
      _mediaGateway.Start();
      Console.Read();
      }
      }
      }
In order to avoid any problems, I recommend you to add System.Configuration.dll as a new reference to your project in Visual Studio. It provides access to configuration files for client applications.
为了避免任何问题,我建议你添加System.Configuration。 dll作为一个新的引用您的项目在Visual Studio。 它提供了访问为客户机应用程序配置文件。
Okay, now take a look at the Graphical User Interface that can be achieved by using my code example. After you have built and run your project succesfully, you can see something similar on your webbrowser like the following figure. It demonstrates how simple it is to monitor your workstation through the Internet in a Chrome webbowser. As you can see, it is now possible for me to check my table and my PC even if I'm out of the house.
好了,现在看看图形用户界面,可以通过使用我的代码例子。 建立并运行您的项目成功后,你可以看到类似的事情在你的浏览器 下面的图 。 它演示了如何简单监控工作站在Chrome webbowser通过互联网。 正如你所看到的,我现在可以检查我的表和我的电脑,即使我的房子。
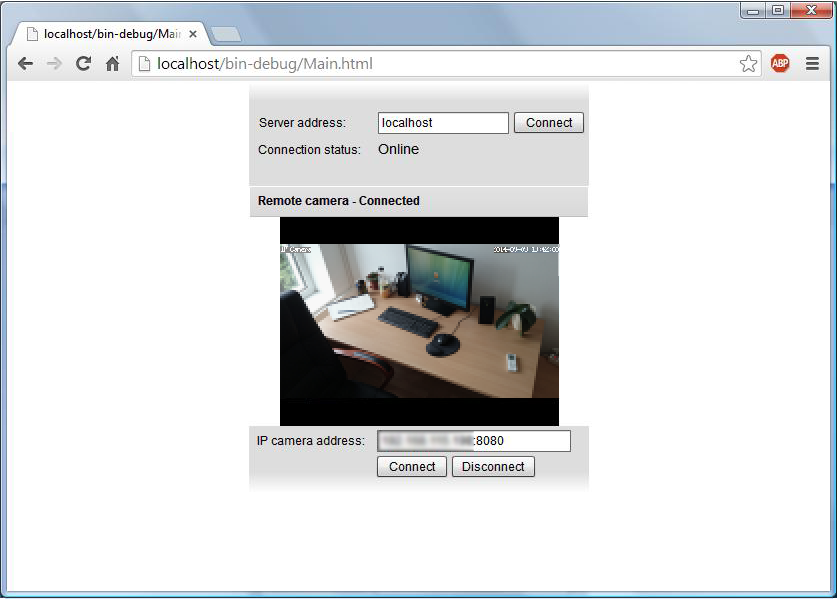
ONVIF IP camera streaming to a website - Source: Self madeONVIF IP相机流媒体网站 ——来源:自我
As a small supplement, in this section I’m going to show how to capture still images from your broadcasted IP camera on a website. Due to this functionality you will be able to take camera snapshots through web-broadcasting and display this image on your website. The snapshots captured on your website will be saved and stored automatically into the folder where your webserver has been installed to.
作为一个小的补充,在本节中,我将展示如何捕捉静止的图像从你的网站上播放IP摄像机。 由于这个功能你可以带照相机快照通过网络视频和显示这张图片在你的网站上。 快照捕获你的网站将被保存并自动存储到你的网站服务器已经安装的文件夹中。
To make the implementation of this feature easier, I attached a new source code that has been created especially for this functionality. So if you are interested in this solution, please download the SnapshotDuringWebBroadcasting.zip file, that - in addition to the source code - contains a new flash-based content. After downloading it, you need to overwrite the previous files with this content.
简化的实现这个功能,我连接创建了一个新的源代码,尤其是对这个功能。 如果你有兴趣在这个解决方案中,请下载 SnapshotDuringWebBroadcasting.zip 文件,除了源代码,包含一个新的基于flash的内容。 下载后,您需要覆盖以前的文件内容。
Okay, it's time to see how to capture still images during a web-broadcasting using C#.NET. First of all, please add one more new item to your References in Visual Studio in the usual way: right-click on ’References’, then ’click on ’Add reference’. Here click on the ’.NET’ tab, then choose and add the System.Drawing.dll file to your references.
好吧,是时候看到如何捕捉静止的图像在网络使用c#。net。 首先,请添加一个新的项目你引用以通常的方式在Visual Studio:右键单击“引用”,然后”点击“添加引用”。 单击“.NET”选项卡,然后选择添加System.Drawing。 dll文件给你参考。
Now let’s see the changes you need to carry out for implementing this functionality. In the MyMediaGateway.cs class you need to add a path as follows. It allows you to find out easily where the snapshots will be found after capturing. After this modification, the MyMediaGateway class should start with the following section:
现在让我们看看你需要的改变实现此功能。 在 MyMediaGateway.cs 您需要添加一个类路径如下。 它允许你找出容易快照捕获后被发现的地方。 这一修改后 MyMediaGateway 类应该从以下部分:
 private Dictionary<IClient, MyClient> clients;
      private IStreamService _streamService;
      private string path;
      public event EventHandler<EventArgs> ClientCountChange;
     public MyMediaGateway(MediaGatewayConfig config, string path)
      : base(config)
      {
      clients = new Dictionary<IClient, MyClient>();
      this.path = path;
      }
Having done the previous modification, let’s continue the development by rewriting the Client invokes region. It should contain the CameraImageCapture method as you can see below: 做完之前的修改,我们继续开发,通过重写Client激活区域。 它应该包含 CameraImageCapture 方法你可以看下面的代码:
#region Client invokes
     public void CameraConnect(IClient client, string uri)
      {
      Console.WriteLine(client.RemoteAddress + " client IP camera connect " + uri);
       var myClient = GetClient(client);
     if (myClient == null)
      return;
       myClient.ConnectCamera(uri);
      }
       public void CameraImageCapture(IClient client)
      {
      var snapShotImage = MyClient.Snapshot.TakeSnapshot().ToImage();
      snapShotImage.Save(path + "\\snapshot.jpg");
      }
       public void CameraDisconnect(IClient client)
      {
      Console.WriteLine(client.RemoteAddress + " client IP camera disconnect.");
       var myClient = GetClient(client);
      if (myClient == null)
      return;
       myClient.DisconnectCamera();
      }
       #endregion
Concerning that the MyClient.cs is responsible for creating the IP camera connection and for streaming its image to your C# application, leave this class unchanged. Let’s move on to the Program.cs class where you need to carry out some modifications. After inserting the necessary additional lines, it should look like as follows:
有关的 MyClient.cs 负责创建IP摄像机连接和c#应用程序流的形象,离开这类不变。 让我们继续 Program.cs 类,您需要进行一些修改。 后插入必要的额外的行,它应该看起来如下:
class Program
      {
      static void Main(string[] args)
      {
    var config = new MediaGatewayConfig();
      config.AddConfigElement(new FlashConfig { ServiceName = "IPCameraServer" });
      Console.Write("Please give the path to the server's Main.html file:");
      var path = Console.ReadLine();
       MyMediaGateway _mediaGateway = new MyMediaGateway(config, path);
      _mediaGateway.Start();
     Console.Read();
      }
      }
After you have done all the necessary modifications succesfully, let’s run the application. When you start the streaming in order to view the camera image in your webbrowser, you can see the same web GUI as before, but a new button can be also seen. This is the 'Capture image' button that can be used to capture the current camera image. After pressing this button, the snapshot will appear automatically in the webbrowser and it will be saved on your PC as well.
你做了所有必要的修改成功后,让我们运行应用程序。 当你开始流,以在你的浏览器查看相机图像,你可以看到相同的web GUI,但也可以看到一个新的按钮。 这是“捕获图像”按钮,可以用来捕获当前相机图像。 按下此按钮后,自动快照就会出现在浏览器将被保存在你的电脑。
ONVIF technology provides a great way for improving your security system by implementing different kind of IP camera solutions. This article demonstrated how to build live IP camera streaming into your website to be able to monitor the area that is under video surveillance through your website. It makes remote surveillance possible as well. In addition to surveillance/ security systems, I can also recommend this project if you’re a video blogger or an ERP system operator. For using my source code, the following prerequsites need to be installed on your PC: a webserver (like Apache), an ONVIF SDK (like Ozeki Camera SDK) and an IDE for C# programming (like Microsoft Visual Studio).
ONVIF技术提供一个很好的方法来提高你的安全系统,通过实现不同的IP摄像机的解决方案。 本文演示了如何构建现场IP相机流向你的网站,能够监视的区域是正在通过你的网站视频监控。 它使远程监测成为可能。 除了监测/安全系统,我也可以推荐这个项目如果你是一个视频博客或ERP系统。 使用我的源代码,以下prerequsites需要安装在你的电脑:一个web服务器(例如Apache),一个ONVIF SDK(如大关相机SDK)和一个C#IDE(如Microsoft Visual Studio)。